Hardware Configuration 
See also: Get Started with Cscape

|
Topic Menu
Hardware Configuration Topics
Hardware Configuration Overview
Before configuring or programming a controller, the target controller model must be selected using Cscape. After selecting a controller, it is possible to determine the functions for that model are available in that specific model, and the controller can be programmed.
Before configuring or programming a controller, the target controller model must be selected using Cscape. After selecting a controller, it is possible to determine the functions for that model are available in that specific model, and the controller can be programmed.
Note: Some controller models have built-in I/O or to have rear mounted I/O modules. When selecting these controller models in Cscape, both the controller and I/O is displayed.
-
Connect the target controller to the PC running Cscape program either directly through serial, USB, or Ethernet port.
See also: Connection Wizard for more details.
-
From Cscape 's Main Menu screen in the Program area, click Hardware Configuration. The Hardware Configuration screen appears as shown below:

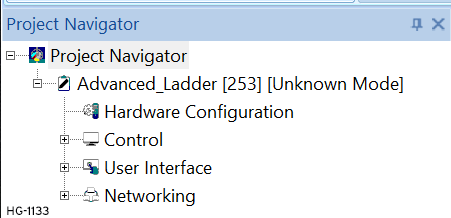
The Hardware Configuration dialog can also be accessed through the Project Navigator:

Return to the Top: Hardware Configuration
Automatic Controller Configuration
Home > Hardware Configuration > Auto Config
To automatically obtain the model of target controller the PC running Cscape is connected to, press the Auto Config System button. This deletes any current settings from the configuration within Cscape, and the I/O that is fitted to the target controller displayed.

-
A Warning box appears and indicates that the settings will be deleted from the configuration within Cscape. If OK, press Yes. Then press OK.
-
If the desired controller appears as the selected controller, press OK, otherwise use Manual Controller Configuration procedure.
-
Make selections from any Network options available in the Network Ports group box
Return to the Top: Hardware Configuration
Manual Controller Configuration
Home > Hardware Configuration

Note: Manual controller configuration does not require a connection to the target controller.
1. Select the Controller series from the Series list box.
2. Select the Device Type from the Device Type list box.
3. Select the Model # from the Model # list box.
4. Make selections from any Network options available in the Network Ports group box.
Note: I/O configurations vary greatly depending on the controller and model number selected. Be aware that the I/O may need additional configuration. For Local I/O Configuration, see General I/O Configuration.
Return to the Top: Hardware Configuration
CPU300 – Dual LAN
Note: From Cscape 10.3 and FW 18.00 onwards, CPU300 is supported with Dual LAN feature.
CPU300 controller has two Ethernet ports LAN1 and LAN2. The user can choose how LAN2 behaves:
-
Daisy Chain (default): LAN2 behaves just like an extra socket on the same network as LAN1. It passes data through, like a small network switch.
-
Dual LAN (ETN300) mode: LAN2 behaves like a separate network connection. It has its own IP address and can run its own communication protocols.
Note: The Daisy Chain works on one network with two sockets. Dual LAN works on two separate networks, one on each socket.
Understanding the Two LAN modes –
Daisy Chain
This is the default mode. In this mode, LAN1 and LAN2 are on the same network. Only LAN1 has an IP address. LAN2 simply passes traffic through, like a built-in network switch. This is useful when user wants to connect devices in a line.
For example, running a cable from network switch to LAN1, then from LAN2 to the next device, such as a remote I/O unit.
Dual LAN (ETN300) Mode:
In this mode, LAN1 and LAN2 work as two separate network cards. Each port has its own IP address and settings, and traffic does not pass from one port to the other. This is useful when the controller must talk to two networks that should be kept apart. Each port can run the supported protocols on its own, and remote I/O can be connected on LAN2 just as on LAN1.
For example, LAN1 can connect to the machine network with remote I/O, while LAN2 connects to the office network for email or cloud monitoring.
Setting up Dual LAN
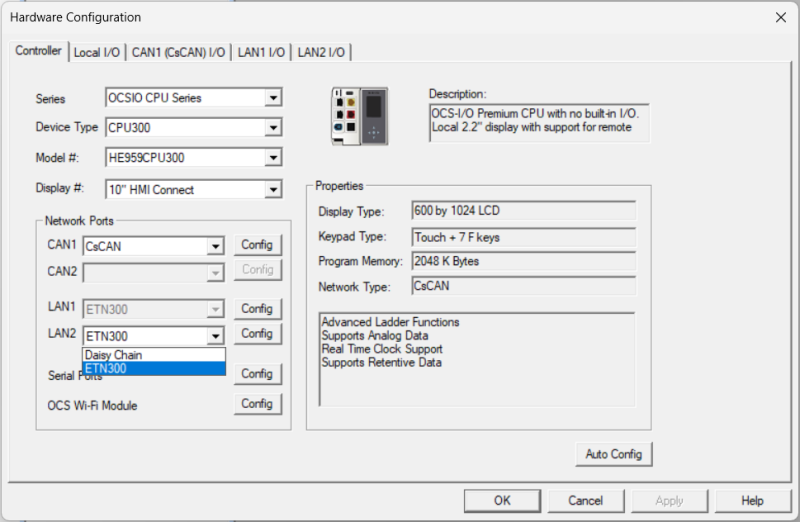
Cscape is the only way for users to change the LAN mode. Use the following steps when changing the LAN mode:
-
Select the Hardware Configuration option
-
Select the Controller tab.
-
From the Series menu, select OCSIO CPU Series.
-
From the Device Type menu, select CPU300
-
From the LAN menu, select ETN300. (This will establish Dual LAN support.)
Which mode to use?
Choose Daisy Chain mode when:
-
User have only one network.
-
User wants to connect another device through the controller without an extra switch.
Choose Dual LAN (ETN300) mode when:
-
The controller must connect to two different networks
-
Each network needs its own IP address range.
Return to the Top: Hardware Configuration