WebMI Manual 

Topic Menu
WebMI Overview


|
Overview of WebMI |
|
|
How to: Using WebMI |

|
Energy Monitoring Application: Cscape Example |
WebMI Introduction
WebMI is a HTML5 based HTTP![]() HTTP (Web Server) - Hypertext Transfer Protocol - A standard Client/Server Internet protocol, based on RFC1945, which transfers web content over a TCP/IP network. server, where access to data and visualizations is enabled from anywhere via web clients. WebMI empowers users to control everything onscreen from a computer, tablet, or other mobile device. It is not necessary for the user to create HTTP web pages. The pages are created by Cscape via the Graphic Editor and transferred to the OCS controller’s removable media card. This turns the OCS controller into a web server that can be used with most internet browsers. WebMI support requires Cscape 9.70 and Firmware 14.14 at a minimum. It is recommended to use Cscape 980 SP2 and Firmware 15.0 and onwards to take advantage of improvements and additional features.
HTTP (Web Server) - Hypertext Transfer Protocol - A standard Client/Server Internet protocol, based on RFC1945, which transfers web content over a TCP/IP network. server, where access to data and visualizations is enabled from anywhere via web clients. WebMI empowers users to control everything onscreen from a computer, tablet, or other mobile device. It is not necessary for the user to create HTTP web pages. The pages are created by Cscape via the Graphic Editor and transferred to the OCS controller’s removable media card. This turns the OCS controller into a web server that can be used with most internet browsers. WebMI support requires Cscape 9.70 and Firmware 14.14 at a minimum. It is recommended to use Cscape 980 SP2 and Firmware 15.0 and onwards to take advantage of improvements and additional features.
The web pages can be published from either the primary controller application or from an alternate ‘Web Designer’ application, which is selected in the Cscape hardware configuration. The typical method for transferring the published web pages to the OCS controller is via FTP![]() FTP - File Transfer Protocol - A standard Client/Server Internet protocol, based on RFC959, which supports file transfers over a TCP/IP network. over an Ethernet connection. Using FTP, the pages are transferred from Cscape to the Removable Media card. Once the published web page files have been successfully transferred to the Removable Media card in the controller, the interface can be remotely viewed from any PC, or wireless device connected to the same local network.
FTP - File Transfer Protocol - A standard Client/Server Internet protocol, based on RFC959, which supports file transfers over a TCP/IP network. over an Ethernet connection. Using FTP, the pages are transferred from Cscape to the Removable Media card. Once the published web page files have been successfully transferred to the Removable Media card in the controller, the interface can be remotely viewed from any PC, or wireless device connected to the same local network.
WebMI Glossary
|
WebMI Glossary |
|
|
American Standard for Information Interchange (over Ethernet) |
|
|
Double Integer |
|
|
File Transfer Protocol |
|
|
HTML5 |
Latest version of Hypertext Markup Language |
|
HyperText Transfer Protocol |
|
|
HyperText Transfer Protocol Secure that uses TLS for secure connection. See also:User Access Level Editor |
|
|
Transmission Control Protocol/Internet Protocol |
|
|
Media Access Control Address |
|
|
SSL |
Secure
Sockets Layer (Used with HTTPS |
|
SVG format |
Scalable Vector Graphics file |
|
TLS Protocol |
Transport Layer Security |
Return to the Top: WebMI Manual
WebMI Licenses 
|
|
WebMI License from Cscape |
|
|
WebMI License from the Web |
A license is required to utilize the WebMI feature and is applied to a single Horner OCS. The license is good for the life of the unit, and there are not recurring costs. There are multiple license options and multiple paths to obtain a license. The license is tied to that OCS unit’s Ethernet MAC ID. At the time this document was published, the WebMI license options are as follows:
|
Part Number |
Users |
Data Points |
Pages |
Licenses |
|---|---|---|---|---|
|
HE-WMV005 (Free Trial Version) |
1 User |
5 |
1 |
1 |
| HE-WMV01001 | Unlimited | 100 | 20 | 1 |
| HE-WMV09901 | Unlimited | Unlimited | Unlimited | 1 |
-
Pages: These are the number of webpages built by Cscape. The number of pages is the same as the number of screens configured in an application. Example: If the application has eight (8) configured screens, a 20-page or unlimited license is required or an alternate application would need to be published that conforms to a 5-page license.
-
Users: The number of users defined in the User Security Configuration for Level Based Access. Refer toPublish WebMI Pages .
-
Data Points: Any screen object that is assigned a %address or variable uses a Data Point. Example: numeric, switch, lamp, and trend objects would use Data Points. Objects not assigned a %address or variable do not use Data Points. Example: static text, bitmaps
 A non-compressed image file format which uses small dots in a grid pattern to create an image., shapes, and screen jumps typically do not use Data Points. However, it is possible through object options such as Attributes to assign a %address or variable. Attributes can be used to override colors, visibility, etc. In this case, because a %address or variable is assigned, a Data Point is used. A single data point used repetitively on multiple screens still counts as only one used data point.
Obtain a WebMI License
Free License
WebMI site: https://licensing.hornerautomation.com/
-
Log in and enter the MAC ID of the Horner OCS to be licensed.
-
Select ‘Free Trial’. The Free trial license includes one Page, one User, and five (5) Data Points.
-
Check the box to accept terms and conditions and click ‘Obtain License.’
-
Next you will have the option to download the license file (recommended). The license file will be placed in the internet browser’s download folder and can be moved to a more convenient location if necessary.
The license is now established in the WebMI system that is located on Horner servers and will be available for retrieval in Cscape later in the process. In the WebMI system, the license is associated with the customer login email address and the entered Horner OCS MAC ID.
Purchase a License
Website: https://hornerautomation.com/product/webmi/
When you complete the purchase, you will receive an email that includes a voucher number and instructions on how to proceed. When the process is completed the license is established in the WebMI system and is associated with the owner’s email address and OCS MAC ID.
For Europe: http://www.horner-apg.com/en/news/2015/horner-webmi.aspx
Purchase a license from Athorized Horner Distributor
-
Distributors in North America can be located by checking the Channel Partner Locator here: https://hornerautomation.com/channel-partner-locator/
-
Distributors in Europe can be located by checking the Distributor Centre here:
When purchasing from a distributor, the distributor provides the voucher number to be entered in the WebMI site: https://licensing.hornerautomation.com/ . When the process is completed the license is established in the WebMI system and is associated with the owner’s email address and OCS MAC ID![]() MAC ID - Media Access Control - Where IP addresses are associated with TCP/IP (networking software), MAC addresses are linked to the hardware of network adapters. A MAC address is a hardware identification number that uniquely identifies each device on a network..
MAC ID - Media Access Control - Where IP addresses are associated with TCP/IP (networking software), MAC addresses are linked to the hardware of network adapters. A MAC address is a hardware identification number that uniquely identifies each device on a network..
Creating and Upgrading of a License from Cscape
From Cscape 9.90 SP4 onwards, all users of Cscape must register their Email address with Horner so that they can be eligible to use licensed products like WebMI.
A valid license is created from the WebMI Licensing website: https://licensing.hornerautomation.com/
The license can be loaded to the device by using the Upgrade Option from Cscape. Creating and Upgrading of a valid license using the "Upgrade Option".
Follow the steps below:
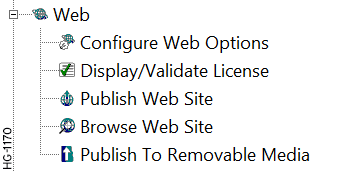
Step 1:Through the Project Navigator > User Interface > Web > Display/Validate License

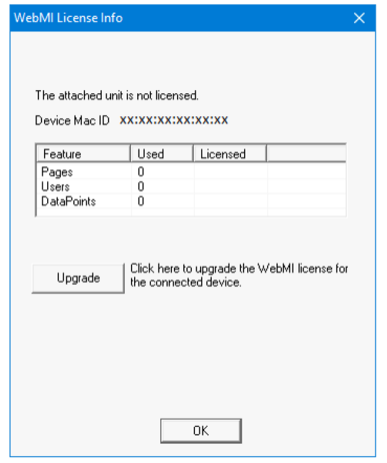
The following window is displayed:
Selecting OK displays the following dialog:
-
Device MAC ID
MAC ID - Media Access Control - Where IP addresses are associated with TCP/IP (networking software), MAC addresses are linked to the hardware of network adapters. A MAC address is a hardware identification number that uniquely identifies each device on a network.: Displays the MAC ID of the connected device. -
Pages: Displays the number of screens used/licensed in the graphics editor.
-
Users: Displays the number of users configured/licensed in the user access configuration of the graphics editor
-
DataPoints: Displays the number of registers used/licensed in the graphics editor.
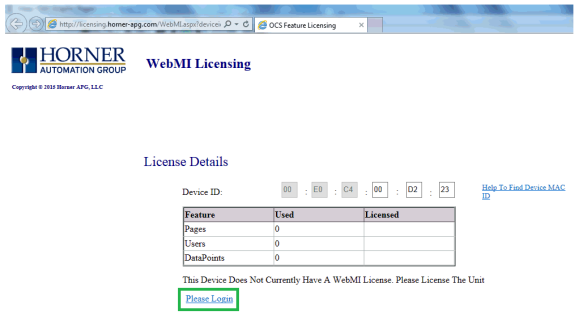
Step 2: Select the Upgrade option and the following window is displayed as well as WebMI Licensing Website will be opened automatically in the default browser.

Return to the Top: WebMI Manual
Apply a WebMI License
WebMI Portal
Once the steps in Step 2 are completed, the following website is opened in the browser with the Device ID mentioned. Click on the Please Login link which takes user to Login Page. This gains access into the WebMI Portal.
Next, login to the website using the already created username and password. The following web page is displayed:

License can be created by using any one of the following options:
-
Pay By Voucher - A voucher Code will be created by the administrator and user can create a license with the code.
-
Purchase a License - The user can purchase a license using credit/debit cards.
-
Free License - A free trial license will be created having 1 page, 1 user and 5 Data Points.
Pay By Voucher
If paying by voucher, select the Pay By Voucher option. In the "Voucher Code" field, enter the voucher code given by the administrator.
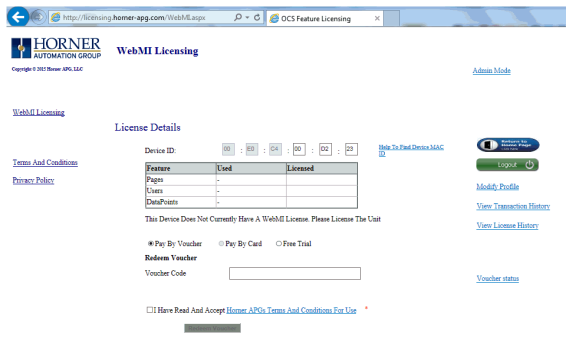
After entering a valid Voucher Code, details regarding the number of licenses remaining, with the number of users, pages and data points is displayed. User needs to accept the Horner APG's Terms and Conditions to redeem the voucher.
Select Redeem Voucher and the following web page is displayed.
Return to Cscape and select the Continue button.
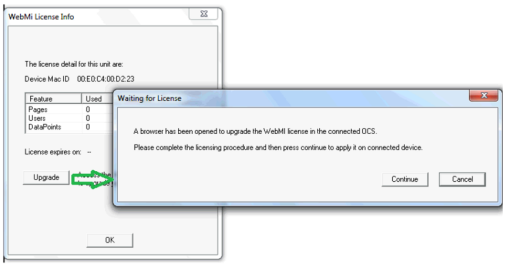
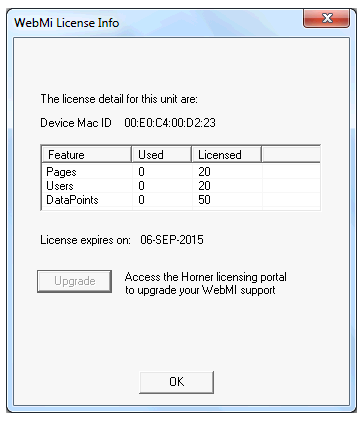
The following window is displayed, clicking on OK loads the connected device with a valid license.
-
Device MAC ID
MAC ID - Media Access Control - Where IP addresses are associated with TCP/IP (networking software), MAC addresses are linked to the hardware of network adapters. A MAC address is a hardware identification number that uniquely identifies each device on a network.: Displays the MAC ID of the connected device. -
Pages: Displays the number of screens used / licensed in the graphics editor.
-
Users: Displays the number of users configured / licensed in the user access configuration of the graphics editor
-
DataPoints: Displays the number of registers used / licensed in the graphics editor.
Free Trial
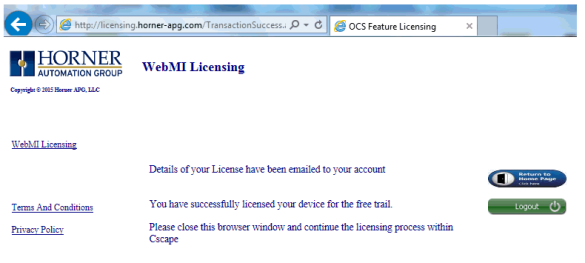
For a Free Trial, select the Free Trail option. The following page is displayed:
The Free Trail license is limited to only 1 page, 1 user and 5 Data Points. After accepting the Horner APG's Terms and Conditions, select Obtain License. The following page is displayed:

Return to Cscape and select the Continue button:

The following window displays and clicking on OK loads the connected device with a valid license.
-
Device MAC ID
MAC ID - Media Access Control - Where IP addresses are associated with TCP/IP (networking software), MAC addresses are linked to the hardware of network adapters. A MAC address is a hardware identification number that uniquely identifies each device on a network.: Displays the MAC ID of the connected device. -
Pages: Displays the number of screens used/licensed in the graphics editor.
-
Users: Displays the number of users configured/licensed in the user access configuration of the graphics editor
-
DataPoints: Displays the number of registers used/licensed in the graphics editor.
Return to the Top: WebMI Manual
Applying WebMI License for a Registered Cscape
From Cscape 9.90 SP4 onwards, all users of Cscape must register their email address with Horner so that they can be eligible to use licensed products like WebMI.
Step 1:Through the Project Navigator > User Interface > Web > Display/Validate License
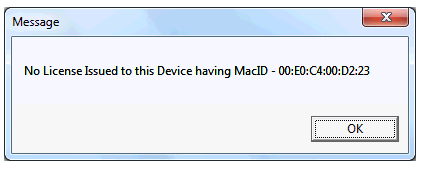
The following window will be displayed if the connected device is not licensed.
Selecting OK, displays the following dialog.
-
Device Mac ID - Displays the MAC ID
MAC ID - Media Access Control - Where IP addresses are associated with TCP/IP (networking software), MAC addresses are linked to the hardware of network adapters. A MAC address is a hardware identification number that uniquely identifies each device on a network. of the connected device. -
Pages - Displays the number of screens used / licensed in the graphics editor.
-
Users - Displays the number of users configured / licensed in the user access configuration of the graphics editor
-
DataPoints - Displays the number of registers used / licensed in the graphics editor.
Selecting the Upgrade option displays the following dialog:
Activate Evaluation License
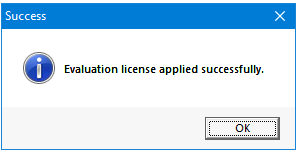
Clicking on Activate Evaluation License activates the trial version license for the device in which user can use 1 pages, 1 users and 5 DataPoints. Once selected, the following confirmation message is displayed.
Select OK.
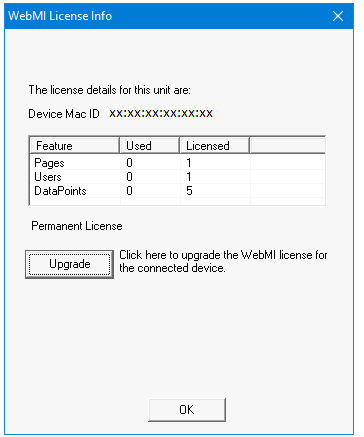
Clicking on OK of the above message, displays the following updated window. The evaluation license is a permanent license which has validity for 100 years from the date licensing the connected device.
-
Device MAC ID
MAC ID - Media Access Control - Where IP addresses are associated with TCP/IP (networking software), MAC addresses are linked to the hardware of network adapters. A MAC address is a hardware identification number that uniquely identifies each device on a network.: Displays the MAC ID of the connected device. -
Pages: Displays the number of screens used / licensed in the graphics editor.
-
Users: Displays the number of users configured / licensed in the user access configuration of the graphics editor
-
DataPoints: Displays the number of registers used / licensed in the graphics editor.
Voucher Code
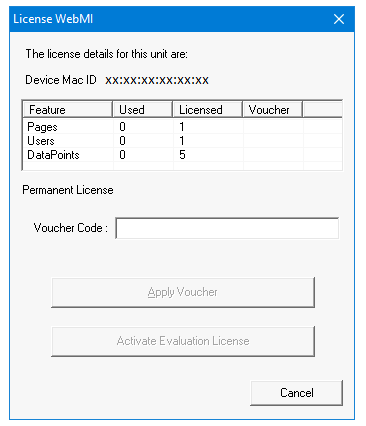
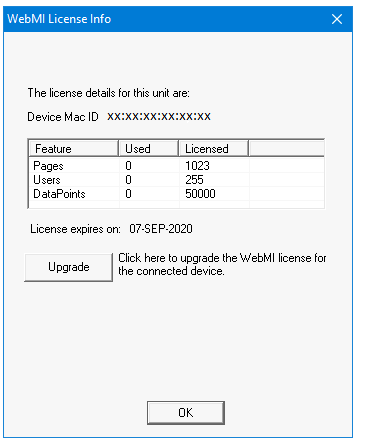
If the user needs to upgrade the license for more credentials, then user needs to get voucher code from Horner and apply the same. For this, select Display/Validate license option from WebMI menu of the Graphics Editor. The following window is displayed:
-
Device MAC ID
MAC ID - Media Access Control - Where IP addresses are associated with TCP/IP (networking software), MAC addresses are linked to the hardware of network adapters. A MAC address is a hardware identification number that uniquely identifies each device on a network.: Displays the MAC ID of the connected device. -
Pages: Displays the number of screens used / licensed in the graphics editor.
-
Users: Displays the number of users configured / licensed in the user access configuration of the graphics editor
-
DataPoints: Displays the number of registers used / licensed in the graphics editor.
Clicking on Upgrade button displays the following window where user can apply the given voucher in Voucher Code field.
After entering valid voucher code, the following details will be displayed in reference to entered voucher code.
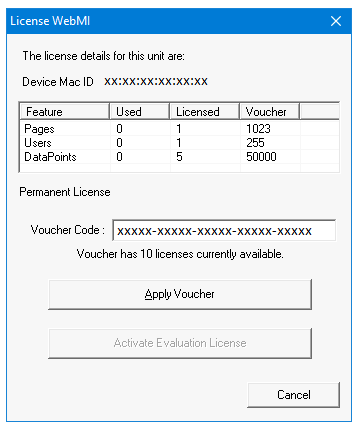
After entering valid voucher code, the voucher details (number of pages, users and DataPoints) will be updated along with number of license available for the given voucher code.
Clicking on Apply Voucher, displays the following window if the connected device is already licensed.
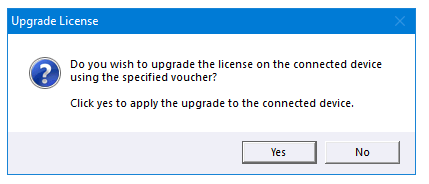
Clicking on Yes displays the following confirmation window.
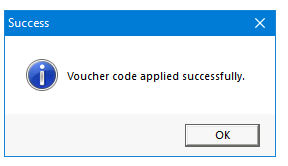
Clicking on OK displays the following window with license and expiration details.
Clicking on OK upgrades the connected device the latest license.
Return to the Top: WebMI Manual
Building Web Pages
Cscape builds web pages according to HTML5 standards. The pages built are derived from the screens developed in the Cscape Graphic Editor. With a few exceptions, what you see in the Cscape Graphic Editor is what you get in the WebMI built web page. The benefit is that you can monitor and control your OCS application remotely without any manual HTML development. Another primary benefit is that the web pages are not limited to predefined templates or premade pages.
Note: Early in the process it should be decided what kind of screen resolution is needed and if the web pages are to perform synchronously with the screens on the OCS. This will determine if pages should be published from the main application or from a Web Designer application.
Publish Pages from Main Application
The main application is the primary program .csp or .pgm file that is downloaded to the OCS controller. This includes the logic, I/O configuration, communication protocols, and screens that appear on the OCS itself. The Hardware Configuration of the main application will show the Series, Device Type, and Model # of the OCS in use. WebMI can publish pages from the main application. The result is that the web pages viewed in an internet browser will appear mostly identical to what is seen on the OCS screen.
When publishing from the main application, Screen Sync for synchronous![]() In step or in phase, as applied to two or more circuits, devices, or machines. Contrasted with Asynchronous. operation may be selected. Use Screen Sync to have the pages displayed in the browser follow what is displayed on the OCS. Synchronous mode also causes the OCS screens to follow what is being done from the internet browser. Example: when Screen Sync mode is checked, when you jump to a new screen in the web browser remotely, the OCS will also jump to that same screen on its display.
In step or in phase, as applied to two or more circuits, devices, or machines. Contrasted with Asynchronous. operation may be selected. Use Screen Sync to have the pages displayed in the browser follow what is displayed on the OCS. Synchronous mode also causes the OCS screens to follow what is being done from the internet browser. Example: when Screen Sync mode is checked, when you jump to a new screen in the web browser remotely, the OCS will also jump to that same screen on its display.
Publish Pages from Web Designer
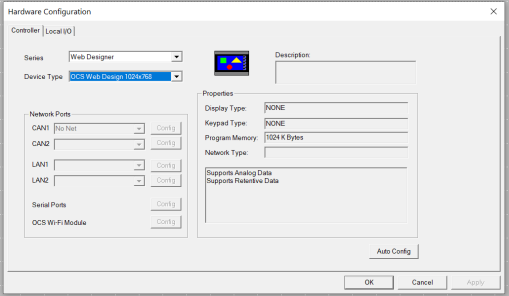
A Web Designer Application is a separate program that allows for larger published screen resolutions which are closer to that of a PC monitor. A Web Designer program does not include logic, I/O configuration, or communication protocols. The Hardware Configuration of the Web Designer program will show Series: Web Designer and Device Type: OCS Web Design + desired screen resolution. Using Web Designer means that there are now multiple application programs for the OCS including the main application and the Web Designer application.
The screen resolution will not match the resolution of the OCS controller, which is typically smaller. Publishing from a Web Designer program frees the developer to build screens without the limitations inherent with the lower resolution OCS screens.
Note: Alarms working with web designer model: To display alarms on a web browser, either publish in the same program, which is downloadied to the device, or configure the same number of alarms to the new program. For example, if users have downloaded six (6) alarms to the device, the user must set six (6) alarms for the web designer models and do publish. Other configurations for alarms are not needed.
Web Designer Models Configuration
Web Designer Models can be accessed through Hardware Configuration.
Home > Program > Hardware Configuration or through the Project Navigator
Select Web Designer in the from the Series box. Model options are listed below:
-
OCS Web Design 1024x768
-
OCS Web Design 1200x800
-
OCS Web Design 1920x1080
Note: The following graphics objects are not supported by WebMI:
-
Note Object
-
Trends – Standard Trend Type
-
Video Object
-
Recipes Object.
-
Removable Media (Only A drive support is added).
-
RCC models do not support Alarms and Trends Objects.
Return to the Top: WebMI Manual
Setting up a Horner OCS
Removable Media / USB / microSD File System
In most controllers, the microSD card memory slot uses the PC-compatible FAT32 file system supporting up to 32GB cards.
Note: In the XL15+ Controllers, the microSD card memory slot supports SDHC, SDXC IN FAT32 format up to 128GB max.
WebMI Ethernet Specifications
|
Ethernet Protocol TCP Port Usage |
|||||
|---|---|---|---|---|---|
|
Ethernet Protocol |
Maximum Connections |
||||
|
Decimal |
Hexadecimal |
Decimal |
|||
|
n/a |
n/a |
0014 & 0015 |
20 & 21 |
4 |
|
|
n/a |
n/a |
0050 |
80 |
4 |
|
|
|
|
01BB |
443 |
4 |
|
|
n/a |
n/a |
4845 |
18501 |
1 |
|
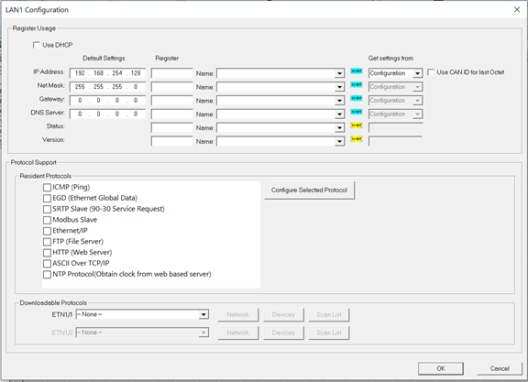
Ethernet Configuration - IP Parameters from Cscape Hardware Config / LAN Config
Open the Cscape Hardware Configuration window and verify that the Series and Device Type match the connected controller. Enter the desired network parameters in the Cscape Hardware Configuration/LAN Config.
For simplicity, the examples in this manual will show a local connection directly from PC to OCS. IP address 192.168.0.110 is used for the OCS IP. Hence, the PC IP address must be set on the same subnet, using an IP such as 192.168.0.x, where x is in the range of 1-254. Both subnet addresses should be set to 255.255.255.0.
Example OCS:
IP Address – 192.168.0.110
Subnet Mask – 255.255.255.0
Gateway – 0.0.0.0
Example PC:
IP Address – 192.168.0.99
Subnet Mask – 255.255.255.0
Gateway – 0.0.0.0
For OCS models with more than one Ethernet connection, these settings must be done on LAN1. Other OCS models have only one LAN port so this is not a concern.
Note: The OCS controller cannot open the door to make itself available to the World Wide Web; the path must be set in place for it. For connections that are to be accessed remotely, use an IP address as assigned by your IT staff or Internet Service Provider. There are also hardware solutions available from companies such as MB Connect, Secomea, Ewon, and others that can allow an OCS and WebMI functionality to be accessible from the internet. For more details, contact your local distributor.
Ethernet Configuration – IP Parameters
For primary operation the IP address, Net Mask, and Gateway should be set in the LAN config of the Cscape Hardware Configuration. There are options to get IP parameters from the LAN Config or to get parameters from registers. It is possible to set the Ethernet IP parameters from the OCS System Menu, but only as a temporary measure. The following points on IP parameter configuration should be considered.
IP Parameters in Non-Volatile RAM
OCS units with HMI Displays
Any IP parameter settings made in the system menu will be lost after cycling power to the unit. It will revert to the last downloaded Cscape LAN Config that was loaded into non-volatile or battery backed RAM.
Cscape LAN Config, Get Settings from – Configuration
When ‘Get settings from’ is set to Configuration, the IP parameters specified under ‘Default Settings’ is used after downloading to the controller. The IP parameters are represented in System Menu / Set Networks and can be edited. However, any edits made from System Menu/Set Networks are not retained through a power cycle. After power cycle, the unit reverts back to the last downloaded Cscape LAN Config that was loaded into non-volatile RAM at power down.
Cscape LAN Config, Get Settings from - Register
When ‘Get settings from’ is set to Register, the IP parameters are retrieved from the OCS registers assigned in LAN Config. Configured registers must be populated with the desired IP parameters.
-
The IP parameters are represented in System Menu/Set Networks
-
The IP Parameters cannot be edited from System Menu/Set Networks while the unit is in Run Mode.
-
The IP parameters always follow the values in the registers unless the OCS unit is placed in idle mode. Then the IP parameters can be edited in System Menu/Set Networks. When the OCS is placed back in Run Mode, it reverts to the registers for IP parameters.
Ethernet Configuration – FTP FTP - File Transfer Protocol - A standard Client/Server Internet protocol, based on RFC959, which supports file transfers over a TCP/IP network.
In Cscape Hardware Configuration / LAN Config, check the box to enable FTP (File Server). With regard to WebMI, FTP is used to transfer published web page files to the OCS removable media card via Ethernet. While it is not essential to use FTP to transfer the web page files, FTP is a more convenient option when the network is properly configured. The alternative to FTP is to manually place the WebMI files on the removable media card directly from the PC, then remove the card from the PC and install into the OCS. More on this inPublish WebMI Pages Configuration
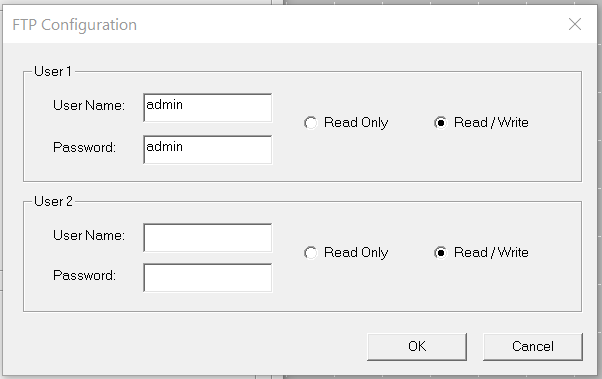
Home > Hardware Configuration > LAN1/2 > Config (button) > FTP > Configure Selected Protocol
When using FTP you must supply a User Name and Password in the FTP Configuration. For the examples in this document, we will use “admin” for User Name and Password.
Select Read/Write.
Level Based Access

|
OCS User Security |
Level Based Access is a feature where a list of users can be created and configured with associated passwords and access levels. Graphic objects on the user screens can be configured to have an associated access level. This level will determine which users can interact with that screen object, based on their access level. Utilizing Level Based Access on screen objects is possible, but not a prerequisite to the implementation of WebMI. However, it is necessary for a WebMI application to configure at least one user in the User Security Configuration.
In a Web Designer application, the User Security Configuration is independent from the User Security Configuration in the main application. The User Security configurations between the main and the web designer do not have to match. Logins from the screen and from WebMI are monitored separately in the status registers. When opening the WebMI page in an internet browser on a completed system, a prompt to enter a User Name and Password will appear. A username and password assigned in the User Security Configuration must be used. (Not the FTP User Name and password).
In the Project Navigator, open the User Interface node and select Users and Security.
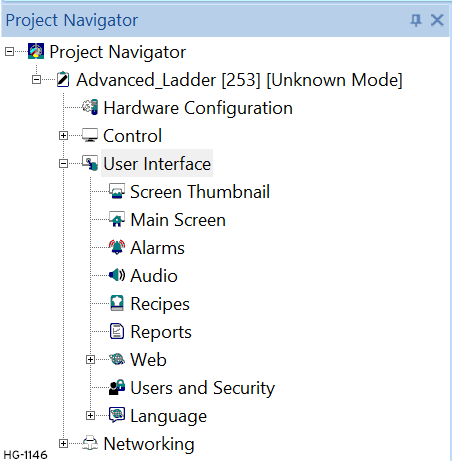
User Access Level Editor
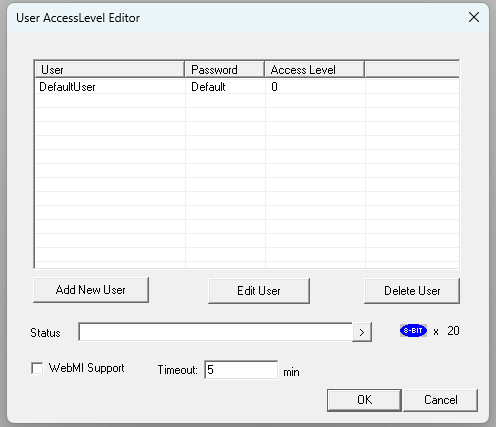
Add a User
-
Highlight the existing “DefaultUser” line and click ‘Edit User’ or select the ‘Add User’ button to create a username, password and assign an access level. Here an access level of 0 was selected, which is the lowest level of access.
-
This is the User Name and Password that is entered later in the internet browser. Up to 255 Users at any of 8 access levels (0 to 7) can be configured. However, in WebMI the number of users possible may be limited depending on the license limitations.
-
For WebMI usage, username/password/access level must be configured as constants. They cannot be assigned as registers.
Status - Local Device Status
Status indicates who is logged in and for how long they have been logged in. The first 20 bytes (8-bit x 20) represent the user logged in directly from the OCS screen, not WebMI. The first 4 bytes show a running time of how long the user has been logged in. It is a double word viewed in DINT format. The remaining 16 bytes contain the logged in user name in ASCII format.
Example:
%R1000 + %R1001 = Running logged in Time (%R1000, format DINT)
%R1002 to %R1009 = Username. (%R1002 – 1009, format ASCII)
WebMI Support
When the WebMI Support box is checked an additional 80 bytes of status are added starting at the 11th word where the local device status leaves off. These 80 bytes show logged in WebMI users. Since four (4) connections are possible at a time, 80 bytes are used. The extra WebMI status is optional. WebMI does not require that the ‘WebMI Support’ box be checked.
Examples:
%R1010 to %R1019 - 1st connection/1st user, i.e., %R1010 + %R1011 = running time for 1st connection/user and %R1012 to %R1019 = 1st logged in username in ASCII format.
%R1020 to %R1029 - 2nd connection/2nd user, i.e., %R1020 + %R1021 = running time for 2nd connection/user and %R1022 to %R1029 = 2nd logged in username in ASCII format.
%R1030 to %R1039 - 3rd connection/3rd user, i.e., %R1030 + %R1031 = running time for 3rd connection/user and %R1032 to %R1039 = 3rd logged in username in ASCII format.
%R1040 to %R1049 - 4th connection/4th user, i.e., %R1040 + %R1041 = running time for 4th connection/user and %R1042 to %R1049 = 4th logged in username in ASCII format.
Timeout (Mins)
This specifies a timeout after which protected screen access mode will resume by logging out the user. The configurable Timeout range can be set from 1 to 60 minutes. After a Timeout occurs, objects on the OCS display screen that are set with level-based security cannot be manipulated until a user logs in again. In relation to WebMI, when the Timeout value is reached, the screen in the internet browser turns a shade darker and at the bottom of the screen the message “User Session Timed Out” appears. Upon Timeout, the WebMI pages are not accessible. To access the pages again, click the browser refresh button.
WebMI Security
Information about Secure Connections - WebMI supports non-secure HTTP![]() HTTP (Web Server) - Hypertext Transfer Protocol - A standard Client/Server Internet protocol, based on RFC1945, which transfers web content over a TCP/IP network. on Port 80 and secure HTTPS
HTTP (Web Server) - Hypertext Transfer Protocol - A standard Client/Server Internet protocol, based on RFC1945, which transfers web content over a TCP/IP network. on Port 80 and secure HTTPS![]() HTTPS - Hypertext Transfer Protocol Secure - A secure version of the HTTP protocol that uses the SSL/TLS protocol for encryption and authentication. on Port 443. For HTTPS connections, TLS ver. 1.2 protocol is supported. Requests that come in via HTTP are not automatically redirected to HTTPS. HTTPS requires a digital certificate from a certification authority (CA).
HTTPS - Hypertext Transfer Protocol Secure - A secure version of the HTTP protocol that uses the SSL/TLS protocol for encryption and authentication. on Port 443. For HTTPS connections, TLS ver. 1.2 protocol is supported. Requests that come in via HTTP are not automatically redirected to HTTPS. HTTPS requires a digital certificate from a certification authority (CA).
Information about Secure Connections
WebMI supports non-secure HTTP on Port 80 and secure HTTPS on Port 443. For HTTPS connections, TLS ver. 1.2 protocol is supported. Refer to the glossary in "WebMI Overview" on page 1.
Requests that come in via HTTP are not automatically redirected to HTTPS. HTTPS requires a digital certificate from a certification authority (CA).
Please contact Technical Support with regards to Security Certificate Generation.
|
Northa America |
Europe |
|---|---|
|
Tel: (317) 916-4274 Website: www.hornerautomation.com Email: techsppt@heapg.com |
Tel: (+) 353-21-4321-266 Website: www.hornerautomation.eu Email: technical.support@horner-apg.com |
Return to the Top: WebMI Manual
Web Options 
Through the Project Navigator > User Interface > Web > Display/Validate License
Configure Web Options
The following window is displayed:
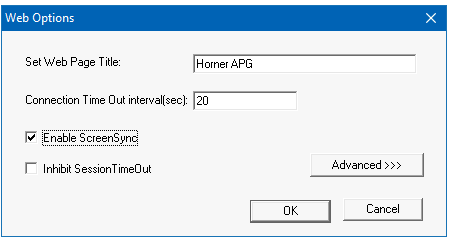
-
Set Web Page Title - This sets the text that will appear in the banner at the top of the web browser when a connection is made to the OCS WebMI Server. By default, it is set to Horner APG, LLC. Most OEMs/Users will want to change this to reflect their company name, or the name of the machine.
-
Connection Time Out interval (sec) - This is the key time-out interval in seconds agreed upon between the WebMI Client (JavaScript Applet) and the WebMI Server in the OCS. WebMI uses the standard HTTP or HTTPS port for compatibility purposes. Using a unique port would cause the connection to be rejected by some network security devices. This is a busy port, which means message delays can occur even on connections with solid bandwidth
The range of frequencies over which a system is designed to operate. The bandwidth is expressed in Hertz between the highest and lowest frequencies.. Because nuisance connection timeouts can be experienced, it is recommended that this value be set to at least 20 seconds. -
Enable Screen Sync - For applications where the WebMI web pages are duplicates of screens in the OCS, this allows screen changes made remotely on the browser to cause screen changes locally on the OCS and vice-versa. This is analogous to the functionality you get with Windows Remote Desktop but with an OCS instead of a computer. Screen Sync is not available in a Web Designer application.
-
Inhibit Session Timeout - Use this option to inhibit a Session Timeout. The session will run indefinitely. This applies only to Session Timeout that is configured in the User Security Configuration. This is not related to a Connection Timeout that happens when internet connectivity is lost.
Advanced Web Options Settings
Selecting Advanced>>> options displays the following window:
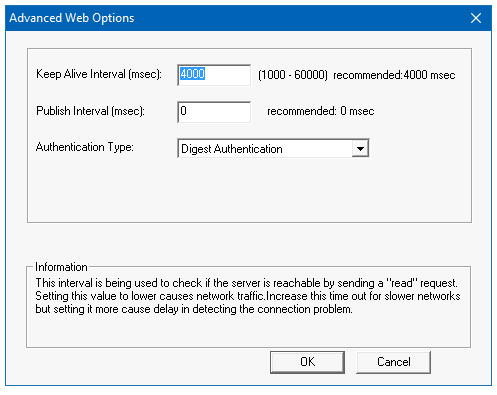
Note: Enable Sync Screen option is not available in Web Designer Models.
-
Keep Alive Interval (ms) - Keep Alive interval specifies at what rate the network heart beat is checked in msec. Heartbeat Messages ensure the browser connection remains active. Without a heartbeat message, mobile browsers will shut off the connection quickly to save bandwidth
The range of frequencies over which a system is designed to operate. The bandwidth is expressed in Hertz between the highest and lowest frequencies.. Default is 4000ms, after every four seconds the client checks for a reply from the device (OCS/Web Server) to confirm the network is up. If there is no reply after four seconds, then it will show a temporary disconnection in the network symbol on the web page. Data changes will not be reflected during this time. During this time, connection is not terminated, but after every four seconds the connection timeout count is checked. -
Publish Interval (ms) - Publish Interval specifies the rate at which the variables will be updated in the web client (internet browser), which is also the delay in sending values to the OCS web server when edited from the browser. If set to the value of 0, publishing is event driven where the changes are reflected immediately. In almost all applications there is no reason to delay the transmission of these new values. So, setting the value to 0ms is recommended. The Publish Interval is unrelated and should not be confused with publishing web pages described later in this document.
Note: For X4 / X7 / X10 / XLEe / XLTe models, publish interval should be set to 1ms or higher for the register data to be updated correctly.
-
Authentication Type - Digest and Basic authentication types are supported. Webserver uses the selected authentication for user login.
-
Digest Authentication - This authentication is more secure. Digest Authentication is the default setting.
-
Basic Authentication - This is less secure and should be used along with SSL connections or VPN
-
Inactivity Timeout
After the configured timeout (session timeout), "user session timed out" message appears and the message remains until user refreshes the page. Once refreshed, license agreement page appears.
Return to the Top: WebMI Manual
Cscape to OCS Connection
Most controllers that support WebMI have the following options for connectivity with Cscape:
-
Serial - The default serial programming port is MJ1.
-
USB - Most controllers that support WebMI feature a Mini-B USB port for programming. No setting has to be made in the controller to make use of the Mini-B port for programming.
-
Ethernet - Refer to prior Ethernet Configuration sections and OCS hardware manual.
For more information on connecting to an OCS with Cscape, please refer to the specific OCS User Manual via the Documentation Search page on the Horner website.
While WebMI is an Ethernet based feature, it is not necessary to connect to the OCS controller via Ethernet to set up the WebMI feature. Any of the above connection methods may be used.
Keep in mind to transfer published WebMI files to the controller via FTP, an Ethernet connection does have to be established. By having this Ethernet connection established, one could connect to the OCS with Cscape via Ethernet if desired. If the Ethernet connection is already established, it then becomes easy to test the WebMI application in an internet browser. The OCS supports simultaneous connections to both Cscape and Internet browsers from the same LAN1 port.
Download
When the logic, protocols, screens, and hardware configuration are completed to satisfaction download the application to the OCS.
Program Checklist:
-
A completed Ethernet setup in LAN1 configuration.
-
FTP should be checked under Resident Protocols and User Name and Password assigned in the LAN1 configuration. (If FTP is to be used to transfer the WebMI pages).
-
Password and User Name assigned in User Security Configuration.
-
In the LAN Config, DO NOT check the HTTP (Web Server) protocol box. This is a separate feature that is not related or compatible with WebMI. Checking the HTTP Web Server protocol will cause WebMI to not work.
Verify the Ethernet Connection
After configuring the OCS Ethernet parameters, it is a good idea to open a command prompt on the PC and Ping![]() A network diagnostic tool used primarily to test the connectivity between two nodes or devices. To ping a destination node, an Internet Control Message Protocol (ICMP) echo request packet is sent to that node. If a connection is available, the destination node responds with an echo reply. Ping calculates the round-trip time of the data packet's route from its source to the destination and back and determines whether any packets were lost during the trip. the OCS to insure an Ethernet connection has been established. To do this, enter “cmd” into the Windows search bar and click on cmd.exe. The following window will appear, enter “Ping 192.168.0.110” (or the IP address of your OCS) and hit Enter.
A network diagnostic tool used primarily to test the connectivity between two nodes or devices. To ping a destination node, an Internet Control Message Protocol (ICMP) echo request packet is sent to that node. If a connection is available, the destination node responds with an echo reply. Ping calculates the round-trip time of the data packet's route from its source to the destination and back and determines whether any packets were lost during the trip. the OCS to insure an Ethernet connection has been established. To do this, enter “cmd” into the Windows search bar and click on cmd.exe. The following window will appear, enter “Ping 192.168.0.110” (or the IP address of your OCS) and hit Enter.
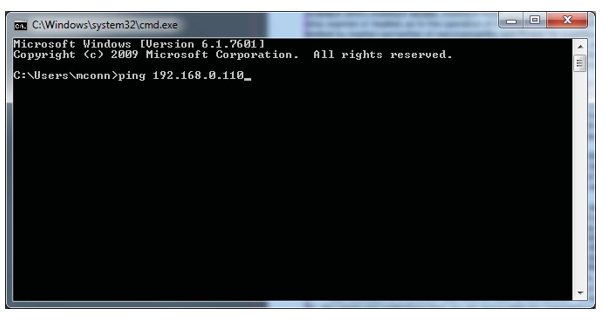
If there is a successful connection established, the command will return a response such as “Reply from 192.168.0.110: bytes=32 time=1ms TLL=64”.
Return to the Top: WebMI Manual
Applying the WebMI License to the OCS
The WebMI license file must be stored on a microSD card that is installed in the Horner OCS. There are two primary ways to transfer the file to the microSD card.
Note: Ensure that the OCS is set to the correct time and date. The time and date has to be the same or later than what is encoded in the license file.
Download License File from WebMI Licensing Portal
The license file needs to download to transfer manually. After obtaining a free or purchased WebMI license from the Horner WebMI website, the license file may be downloaded. This is an encrypted file that contains license details including the MAC ID of the intended OCS of which to apply the license. The content of this file should not be edited. Editing the content of the file will invalidate the file. The original filename is different for every license and includes the MAC ID of the licensed device. Example filename: WebMILicense-00E0C404c625.
Note: If you have already executed the steps to obtain a free Evaluation license or applied a license by using a voucher number from the Cscape graphic editor, you have already transferred the license file to the removable media card in the controller.
Transfer the License File Manually
The license file needs to download to transfer manually. After obtaining a free or purchased WebMI license from the Horner WebMI website, the license file may be downloaded. This is an encrypted file that contains license details including the MAC ID of the intended OCS of which to apply the license. The content of this file should not be edited. Editing the content of the file will invalidate the file. The original filename is different for every license and includes the MAC ID of the licensed device. Example filename: WebMILicense-00E0C404c625.
Transfer the License File to the microSD Card Manually
First rename the file. The filename should be renamed to FIRMWARE.LIC . Copy and paste or drag and drop the newly renamed FIRMWARE.LIC file onto the root directory of a microSD card installed in the PC. Then it is just a matter of removing the microSD card from the PC and installing it into the OCS controller whose MAC ID was used to set up the license. There are no further steps to be taken for manually transferring the license file. If there are multiple OCS units on site to be licensed, it is recommended to organize the license files so that they are easily paired with the correct OCS.
Let Cscape Transfer the File
Establish a connection from Cscape to the controller via serial, USB, or Ethernet. The PC running Cscape must be connected to the internet. An Ethernet connection from Cscape to the OCS is technically not required to transfer the license file. The connection can be serial or USB. However, an Ethernet connection is required later if transferring files via FTP and to test the WebMI feature. A common arrangement is to have the PC LAN port set up to talk to the OCS on its own subnet while the wireless connection on the PC is set to access the Internet.
Alternately the PC and OCS can be on the same subnet with access to the broader network, which would negate the need for two separate Ethernet subnets. To do this typically requires that your IT department or internet service provider issue an IP address for the OCS.
Verify the WebMI License File Transfer
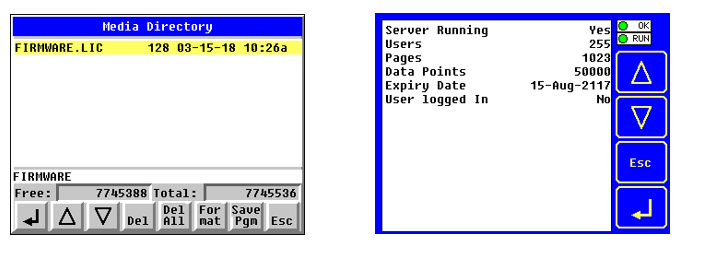
To verify that the license file has been transferred to the microSD card installed on the Horner controller, enter the System Menu on the unit and select Removable Media. The file FIRMWARE.LIC should be present. License Details can also be selected from the System Menu.
Images below: System Menu > Removable Media and System Menu > License Details
Alternately, WebMI status and license details can be viewed in system registers %SR209 and %SR218-222. The system registers are conveniently viewed in Cscape/Data Watch for RCC controllers that do not have displays.
|
WebMI Status Registers |
|
|---|---|
|
%SR209.3 |
WebMI server status. Bit 3 is ON if server running. |
|
%SR209.4 |
WebMI user logged in status. Bit 4 in ON if 1 or more users logged in. |
|
%SR209.9 to %SR209.16 |
Number of Users. Shows in upper byte in decimal format. |
|
%SR218 |
Number of Webpages, license detail. |
|
%SR219 |
Number of Data Points, license detail. |
|
%SR220-%SR222 |
Expiry Date of WebMI License, license detail. |
Return to the Top: WebMI Manual
Publish WebMI Pages 
See also: Web Options
See also: User Access Level Editor
|
|
Create Wepages |
Publish WebMI Pages Configuration
To publish WebMI Pages is to trigger Cscape to convert the user-created screens into HTML5 based web pages and save those pages to the PC hard drive. A secondary step included in the publishing process is to transfer the published pages via FTP over Ethernet to the OCS/microSD.
Publishing does not technically require that Cscape be connected to the OCS controller and does not require that the OCS be connected to the PC via Ethernet. However, by default Cscape expects that both of these connections are made prior to publishing. To avoid ‘No Connection’ warnings and extra steps, it is more efficient to establish an Ethernet connection to the OCS with FTP configured and be connected to the OCS with Cscape by any of the connection methods: serial, USB, or Ethernet.
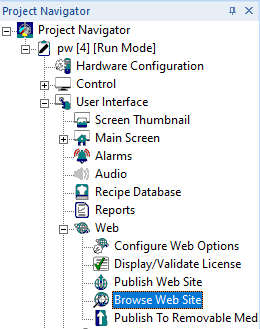
WebMI options can be accessed under web of Project Navigator.
Selecting Publish Web Site, opens the following window:
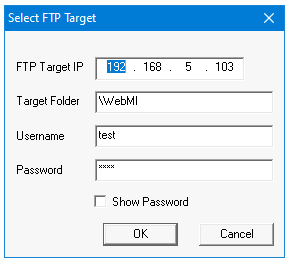
The Select FTP Target dialog pops up first. Enter the IP address assigned in the OCS controller. The default Target Folder is \WebMI, which should be left as is. Enter the User name and Password that is setup in the FTP configuration in Home > Controller > Hardware Configure > LAN Config.
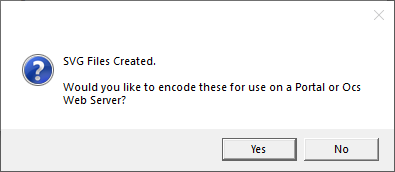
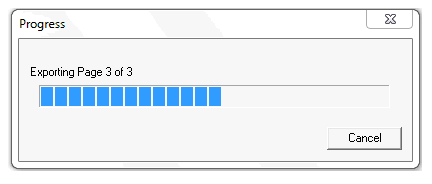
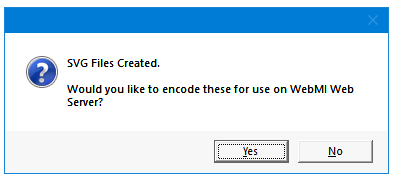
Select OK after making the configuration, the progress bar appears where in SVG files are created.
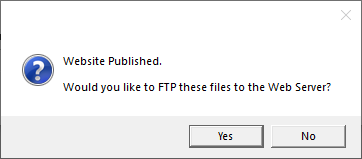
Now that the WebMI files have been published, you have two options for transferring the files to the Web Server (the OCS controller). You can transfer files via FTP, or you can manually transfer the files. Cscape now asks if you would like to transfer the files to the Web Server via FTP. Click Yes to continue or if manual transfer is desired click No to cancel the operation.
After the files are created, the following message box appears:
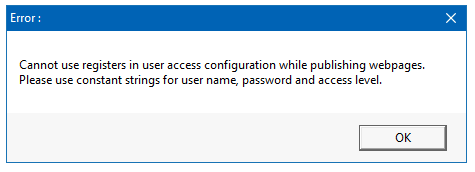
Selecting Yes publishes website if proper user access (i.e., constants) is configured in user access configuration.
The dialog box closes itself after publish.
If user access is configured as registers then the following error message appears:
After website is published, asks for FTP the files to the server.
Manual File Transfer
After encoding the SVG files for use with WebMI the web pages are now published, but not yet sent to the OCS/microSD. Cscape automatically places published files in the Windows My Documents folder at this default location shown below.
Webpage SVG File Location: C:\Users\User name\AppData\Local\Cscape\Instance001\Program001\Cscape\SVGExport and Cscape\
To transfer the files manually, install the microSD card into the PC. Copy the WebMI folder and paste it into the root directory of the microSD card. Then remove the microSD card from the PC and install it into the OCS controller.

Use FTP to Transfer Files
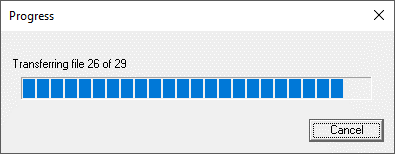
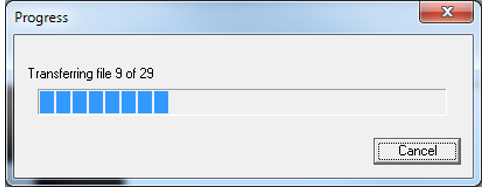
When Cscape asks ‘Would you like to FTP these files to the Web Server?’ click ‘Yes’. Cscape will then transfer the files via FTP.
See Below: FTP progress of a test program containing one screen. A larger program with several configured screens will have more files to transfer.
Return to the Top: WebMI Manual
Launch Web Site 
To launch the website from the OCS Web Server enter the IP address of the OCS in the address field of a web browser such as Chrome, Microsoft Edge, or Firefox. If you can Ping the OCS from your PC then you have a valid Ethernet connection and should be able to launch the page. Alternately you can launch the OCS Web Server from Project navigator > web > Browse web site.
When you first type in the IP Address of your OCS in your web browser or launch from Cscape, a connection procedure is initiated.
Step 1: Go to Project navigator > web > Browse web site.
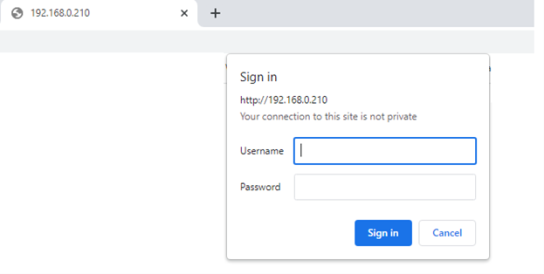
Step 2: User Name and Password credentials are requested and authenticated. These are the credentials you created in the User Security Configuration. This ensures that only authorized personnel can access the web pages and allows different access levels to be granted to users of different capability.
Selecting Browse Web Site opens the web pages in default browser and asks for user credentials. Give the user credentials configured in Cscape > Project Navigator > User and Security.
Step 3: After giving the correct user credentials, clicking on OK takes to License agreement page where user needs to accept the license and then continue to view the pages.
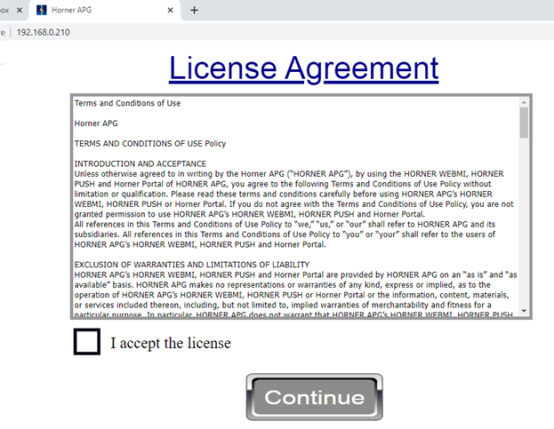
The WebMI Usage License is accepted by the user. With a basic connection now established – the WebMI server in the OCS “serves up” graphics information along with a JavaScript Applet which runs on the browser as a WebMI Client. This provides the browser with everything it needs to know in order to draw the default OCS web page. The WebMI Client (JavaScript Applet running on the browser) and WebMI Server (running on the OCS) agree upon a connection timeout. This is the value that is set in Cscape: Connection Time Out interval (sec)
Step 4: The WebMI Client and WebMI Server go into data communications mode – where only the following messages are exchanged over the network – saving bandwidth:
-
Current OCS data values for each of the Read/Only and Read/Write objects on the web page, requested by the WebMI Client running in the browser and provided by the WebMI Server on the OCS.
-
Heartbeat Messages – Ensure the browser connection remains active.
-
Without heartbeat messages – Mobile browsers will shut off the connection quickly to save bandwidth. This interval at which heartbeats are sent is set in Cscape as the Keep Alive Interval (ms).
-
Changed data values for Read/Write objects, transmitted by the WebMI Client on the browser to the WebMI Server on the OCS. These are typically sent on a change of state basis as the user clicks buttons and updates data objects on the web page. The interval can be delayed by setting the Publish Interval (ms) parameter in Cscape to a non-zero value, but this is not recommended.
Note:
-
License Agreement page will not be displayed if there are no user editable fields in the WebMI project.
-
If editable fields are configured in WebMI project, then License Agreement page will be displayed only once i.e., once user accepts the license first project page will be displayed, again if same user logs in then License Agreement page will not be displayed and directly first project page will be displayed.
Launching Web Pages from Any Browser
Open any web browser (IE, Chrome, Mozilla, Safari etc) from any device (iOS devices, android devices, windows devices etc). Give the IP address of the device (Same as FTP Target IP) on the address bar, once web browser connects to the device it asks for user credentials. Give the user credentials and follow the procedure from Step 3 as explained above.
Any changes made in the website will be reflected on the device and vice versa.
Return to the Top: WebMI Manual
Publish to Removable Media 
Publish to Removable Media can be accessed under web of project navigator
The following windows will be displayed:
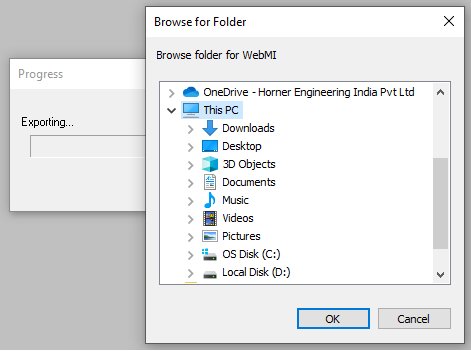
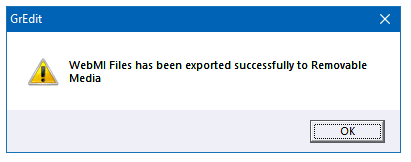
Browse the folder/removable media to copy the web pages. Once path is selected, click on OK. Progress bar window for exporting and publishing pages will be displayed. Once Web pages are copied to removable media, the following message will be displayed.
Return to the Top: WebMI Manual
Import Tags
User will have to import tags before publishing (FTPing) web pages when using Web designer models for IEC and Advanced ladder with tags editor.
Select WebMI > Publish Website for Web designer models of IEC/Advanced ladder with tags editor.
-
FTP Target IP - IP address of the device that is configured in Hardware Configuration.
-
Target Folder - This is the default folder where HTTP pages / SVG files are created in SD Card.
-
Username - Username configured for FTP in Hardware Configuration
-
Password - Password configured for FTP in Hardware Configuration.
Select OK after the configuration, the following progress bar appears where in SVG files are created.
After the files are created, the following message box appears.
Selecting Yes publishes website if proper user access (i.e., constants) is configured in user access configuration.
If user access is configured as registers then the following error message appears:
Selecting Yes displays the following window if tags are not imported before publishing website.
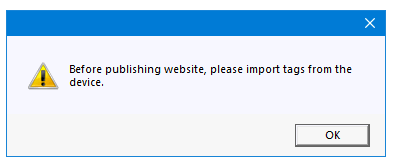
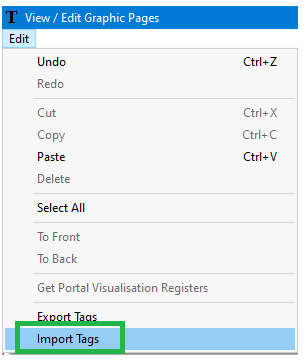
Click on Ok. Select Edit > Import Tags from graphics editor window.
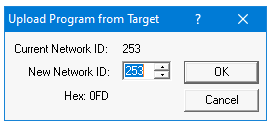
The following window will be displayed. Configure the Network ID and select OK.
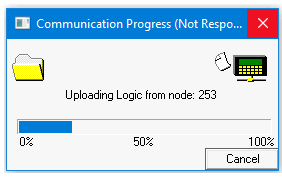
Once selected OK, the following window will be displayed.
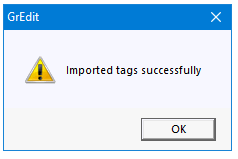
After tags are imported, the following window will be displayed.
Again select WebMI > Publish Website to publish the web pages to removable media. Select the Browse Website to visit page.
Return to the Top: WebMI Manual
Limitations of Retentive Trend Type
Not Supported
-
Retrieval of historic data may be delayed depending on the amount of data being retrieved.
-
Retrieval of historic data may be slow depending on the speed of internet being used.
-
For supporting retentive trends user need to configure the same register with logging in the OCS downloaded program.
-
Retentive trend has to be configured on OCS in order to be displayed on the WebMI :
-
Pens has to match
-
Time base (start & stop): any
-
Sampling rate: preferable same, but if different sample rates are configured, then OCS should be equal or higher sample rate compared to WebMI
-
Limitations of Retentive Trend Type
-
Retrieval of historic data may be delayed depending on the amount of data being retrieved.
-
Retrieval of historic data may be slow depending on the speed of internet being used.
-
For supporting retentive trends user need to configure the same register with logging in the OCS downloaded program
-
Retentive trend has to be configured on OCS in order to be displayed on the WebMI:
-
Pens has to match
-
Time base (start & stop): any
-
Sampling rate: preferable same, but if different sample rates are configured, then OCS should be equal or higher sample rate compared to WebMI
-
Potential Problems with Trend Properties
Potential problems with using Continuous and Snapshot scope Objects in Horner WebMI:
The scope objects, although available in the Horner WebMI system need special consideration.
Problems in using these objects stem from the fact that the sample period can be set very low – as low as 10ms. The objects are updated by transferring values from the OCS running the WebMI system to the browser displaying the trend at the rate required, however there are a number of problems which can occur which would cause the update rate to be unachievable.
These problems would include:
-
Intermittent Web connection – for example where the connection is dropping many packets between OCS and browser.
-
High Latency connections – for example GPRS modem connections where packets can take 20 seconds or more to travel from OCS to browser.
-
OCS is in a high load situation – for example running logic with a very long scan time, or while displaying objects with high processor overheads such as the scope objects themselves or video objects
Typically a system suffering from this problem would show a trend similar to the following:
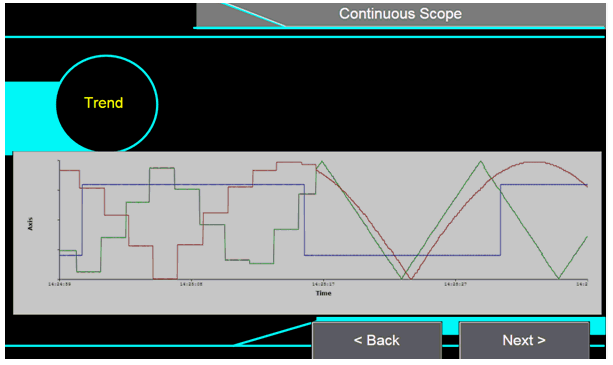
Here the first half of the trend is filled whilst the OCS was running a very processor intensive graphics screen, and at the midpoint changed to much simpler graphics display.
Ways to counteract the problems
-
Consider whether the scope objects are really applicable in the application. Is it really useful to have a trace of what happened to a set of values over a very short period at a remote location.
-
Select one of the other (standard/retentive) trend objects with much higher sample periods.
-
Reduce the sample rate of the scope type trends in use.
-
Increase the graphics time slice to as close to 50ms as the application will allow
-
Avoid multiple simultaneous browser connections to the device where possible
Limitations on Alarms Object
-
Alarm text on Web designer models are replaced by alarm text of Cscape program that is downloaded to unit.
-
Alarm text on Web browser will not be readable if scaling of alarm object is not proper – Expected aspect ratio is 4:3. NOTE: User must take care to configure alarm object such that the alarm object is big enough to show the entire alarm text and acknowledge status.
-
Acknowledge All (Ack All), Clear (Clr) and Clear All (Clr All) states are not supported in Web browser.
Note: For WebMI, Horner is using an independent JPEG group library for JPEG conversion.
Return to the Top: WebMI Manual
WebMI Troubleshooting
|
|
WebMI Helpful Hints and Troubleshooting |
This troubleshooting section will focus on licensing, publishing, and client to browser connections. For the most part what you see in Cscape is what you get on the internet browser. There are a small few exceptions. For the most up to date list of supported graphic features please refer to the Cscape Help file.
|
WebMI Troubleshooting - Cscape |
|
|---|---|
|
Cscape Messages |
Description / Course of Action |
|
Date on the device does not match with the license date. Please set correct date on Device. |
The Real Time Clock date cannot be older than the date encoded in the license. Correct the date in the OCS. *NTP |
|
A Removable Media card is not present in the target device. The Removable media card is required for transfer of the license information. Please insert a Removable Media card into the device and try again. |
Ensure that the functioning microSD card is present in the controller. |
|
No users have been added to the User Access Table. As a result, once the project is published it will not be possible to log in to the WebMI. Do you still wish to proceed? |
Ensure that at least one user is configured in User Security Configuration. Graphics/Screen Editor > Config > User Security Configuration |
|
The request to connect to and log on to the FTP server failed. |
While connecting, if any of the login credentials are not entered correctly or if there is no Ethernet connection, this message will appear. Check login credentials and ping response. |
|
Device communications error. Check device connection and relaunch the graphics editor. |
Cscape is not connected to the controller. Check Local and Target in the lower right-hand corner of Cscape for connection status. If
developing in a Web Designer application, ensure that the Target number is
set to the controllers CsCAN node ID |
|
C:\Users\name\Documents\Cscape\LicenseFiles\ firmware.lic was not found. |
|
|
No License has been Issued to the connected device (MACIDxx:xx:xx:xx:xx:xx) |
Obtain a valid license from: https://licensing.hornerautomation.com/ And install it on the microSD card of the device. See Section 5 on installing the license. |
|
The License files on this unit do not match that on the server (or the device had been license but the license has not been applied to the unit). Do you want to Download the server license to the device? |
Either manually copy the FIRMWARE.LIC file onto the microSD card of the device or select Yes and the license will be automatically copied onto the device. |
|
WebMI Troubleshooting - WebMI |
|
|---|---|
|
Website Messages |
Description/Course of Action |
|
!!!Error!!! OCS is not in RUN mode. Please put the OCS in RUN mode to access the web pages. |
Place the OCS in RUN mode and then refresh the browser. |
|
404 Not Found Requested Entity: |
Ensure that WebMI folder is present in root of microSD card before accessing web pages. |
|
!!!Error!!! Date on the OCS does not match with the license date. |
The date on the controller is before the purchased license date. Set the current time and date on the OCS. |
|
This site can’t be reached. (Chrome) Or This page can’t be displayed (Windows IE) |
Ensure all of the WebMI published files are present on the microSD and that the card is installed and functioning in the OCS. |
|
401 Authorization Required |
* Ensure that the User Name and Password match that entered in User Security Configuration. * Cycle power to the OCS after publishing and transferring WebMI files. |
|
!!!Error!!! Invalid license. Please install a valid license or contact Horner APG to purchase the license for this OCS… |
Install valid license and refresh the web browser to access the web page. |
|
Webpages on the OCS does not match with the webpages downloaded/built through Cscape. Please download/copy correct webpage built through Cscape to OCS and put it in run mode to access the web pages. |
If the FTP transfer stops during publishing, then the user needs to republish the WebMI files. |
|
!!!Error!!! The target OCS license has insufficient credits. Please contact Horner APG to purchase a new license with ore credits for this OCS. |
Either purchase higher credentials or configure according to the license purchased. |
|
!!!Error!!! There is no valid program on the device. Please download a valid program to device and put it in run mode to access the web pages. |
Download a valid program to device and put it in run mode to access the web pages. |
|
Authentication Required A username and password are being requested by… The site says: “webMI” |
Ensure that the correct username and password is given. |
Return to the Top: WebMI Manual
WebMI Terms and Conditions of Use
INTRODUCTION AND ACCEPTANCE
Unless otherwise agreed to in writing by the Horner APG (“HORNER APG”), by using the HORNER WEBMI, HORNER PUSH and Horner Portal of HORNER APG, you agree to the following Terms and Conditions of Use Policy without limitation or qualification. Please read these terms and conditions carefully before using HORNER APG’s HORNER WEBMI, HORNER PUSH or Horner Portal. If you do not agree with the Terms and Conditions of Use Policy, you are not granted permission to use HORNER APG’s HORNER WEBMI, HORNER PUSH and Horner Portal.
All references in this Terms and Conditions of Use Policy to “we,” “us,” or “our” shall refer to HORNER APG and its subsidiaries. All references in this Terms and Conditions of Use Policy to “you” or “your” shall refer to the users of HORNER APG’s HORNER WEBMI, HORNER PUSH and Horner Portal.
EXCLUSION OF WARRANTIES AND LIMITATIONS OF LIABILITY
HORNER APG’s HORNER WEBMI, HORNER PUSH and Horner Portal are provided by HORNER APG on an “as is” and “as available” basis. HORNER APG makes no representations or warranties of any kind, express or implied, as to the operation of HORNER APG’s HORNER WEBMI, HORNER PUSH or Horner Portal or the information, content, materials, or services included thereon, including, but not limited to, implied warranties of merchantability and fitness for a particular purpose. In particular, HORNER APG does not warrant that HORNER APG’s HORNER WEBMI, HORNER PUSH or Horner Portal, its servers, or email sent from HORNER APG are free of viruses or other harmful components. HORNER APG will not be liable for any damages of any kind arising from the use of, or inability to use, HORNER APG’s HORNER WEBMI, HORNER PUSH or Horner Portal, including, but not limited to, direct, indirect, incidental, punitive, and consequential damages, whether in contract, tort, or otherwise. Certain state laws do not allow limitations on implied warranties or the exclusion or limitation of certain damages; accordingly, the above limitations or exclusions may not apply to you.
GENERAL USE OF THE HORNER WEBMI, HORNER PUSH AND HORNER PORTAL
-
In order to access certain features of HORNER APG’s HORNER WEBMI, HORNER PUSH and Horner Portal, you may be required to provide information about yourself (such as identification or contact details) as part of the registration process, including to obtain a HORNER APG account to access certain sections of the HORNER WEBMI, HORNER PUSH and Horner Portal, or as part of your continued use of such HORNER WEBMI, HORNER PUSH or Horner Portal. You agree that any registration information you give to HORNER APG will always be accurate, correct, and up to date.
-
You agree to use HORNER APG’s HORNER WEBMI, HORNER PUSH and Horner Portal only for purposes that are permitted by (a) this Terms and Conditions of Use Policy, and (b) any applicable law, regulation, or generally accepted practices or guidelines in the relevant jurisdictions (including any laws regarding the export of data or software to and from the United States or other relevant countries).
-
You agree not to access (or attempt to access) HORNER APG’s HORNER WEBMI, HORNER PUSH or Horner Portal by any means other than through the interface that is provided by HORNER APG. You specifically agree not to access (or attempt to access) any part of HORNER APG’s HORNER WEBMI, HORNER PUSH or Horner Portal through any automated means (including use of scripts or web crawlers) and shall ensure that you comply with the instructions set out in any robots.txt file present on such HORNER WEBMI, HORNER PUSH or Horner Portal.
-
You agree that you will not engage in any activity that interferes with or disrupts HORNER APG’s HORNER WEBMI, HORNER PUSH or Horner Portal (or the servers and networks which are connected to such HORNER WEBMI, HORNER PUSH or Horner Portal).
-
You agree that you will not reproduce, duplicate, copy, republish, upload, post, transmit, distribute, modify, sell, trade, or resell HORNER APG’s HORNER WEBMI, HORNER PUSH or Horner Portal, or any portion, feature, or content thereof, for any purpose; provided that you may download one copy of the materials on HORNER APG’s HORNER WEBMI, HORNER PUSH or Horner Portal on any single computer for your non-commercial use only and you may print one copy of the materials on HORNER APG’s HORNER WEBMI, HORNER PUSH or Horner Portal for your non-commercial use only; further provided that you keep intact all copyright and other proprietary notices on any such downloaded or printed materials.
-
You agree that you are solely responsible for (and that HORNER APG has no responsibility to you or to any third-party for) any breach of your obligations under the Terms and Conditions of Use Policy and for the consequences (including any loss or damage which HORNER APG may suffer) of any such breach.
-
You must be 18 years or older and of legal consent age to use HORNER APG’s HORNER WEBMI, HORNER PUSH or Horner Portal unsupervised. If you are under the age of 18, you may only use such HORNER WEBMI, HORNER PUSH and Horner Portal in conjunction with, and under the supervision of, your parents or guardians.
-
You must be a human. HORNER APG accounts registered by “bots” or other automated methods are not permitted.
-
Your HORNER APG account may only be used by one person – a single HORNER APG account shared by multiple people is not permitted.
-
You agree and understand that you are responsible for maintaining the confidentiality and security of your HORNER APG account and password, if any. HORNER APG cannot and will not be liable for any loss or damage from your failure to comply with this security obligation.
-
You agree that you will be solely responsible to HORNER APG for all activities that occur under your HORNER APG account.
-
If you become aware of any unauthorized use of your HORNER APG account or password, you agree to notify HORNER APG immediately.
-
We reserve the right to modify or discontinue, temporarily or permanently, your access to HORNER APG’s HORNER WEBMI, HORNER PUSH or Horner Portal, or your HORNER APG account with or without notice.
COMMENTS, COMMUNICATIONS, AND OTHER CONTENT
Certain features within HORNER APG’s HORNER WEBMI, HORNER PUSH or Horner Portal may allow you to post comments, send emails and other communications, and submit suggestions, ideas, comments, questions, or other information (together “Commenting”). You agree, understand and represent that all of your Commenting: (i) is accurate, (ii) is owned or otherwise controlled by you, (iii) is not illegal, obscene, threatening, defamatory, invasive of privacy, infringing of intellectual property rights, or otherwise injurious to third-parties, and (iv) does not consist of or contain software viruses, political campaigning, commercial solicitation, chain letters, mass mailings, or any form of “spam.” You may not use a false e-mail address, impersonate any person or entity, or otherwise mislead as to the origin of Commenting. HORNER APG reserves the right (but not the obligation) to monitor and edit or remove any Commenting activity or content. If you do post Commenting content or submit Commenting material, you grant HORNER APG a nonexclusive, royalty-free, perpetual, irrevocable, and fully sublicensable right to use, reproduce, modify, adapt, publish, translate, create derivative works from, distribute, and display such Commenting content throughout the world in any media, including the right to use the name that you submit in connection with such Commenting. HORNER APG takes no responsibility and assumes no liability for any commenting content posted by you or any third-party.
LINKS
HORNER APG’s HORNER WEBMI, HORNER PUSH and Horner Portal may be linked to other HORNER WEBMI, HORNER PUSHs not maintained by us. We do not control and are not responsible for the content of and policies governing use of those HORNER WEBMI, HORNER PUSHs not maintained by us. The inclusion of any link to such HORNER WEBMI, HORNER PUSHs does not imply approval of or endorsement by us of the HORNER WEBMI, HORNER PUSHs or the content thereof.
PRIVACY
Please read our Privacy Policy which also governs your use of HORNER APG’s HORNER WEBMI, HORNER PUSH and Horner Portal to understand our policies about what information we collect, how we will treat this information, and what options you have to direct our activities.
OWNERSHIP, COPYRIGHT AND TRADEMARK
All content included on HORNER APG’s HORNER WEBMI, HORNER PUSH and Horner Portal, such as trademarks, service marks, trade names, text, graphics, logos, icons, button icons, images, data compilations, domain names, and software, is the property of HORNER APG or its content suppliers or used with permission. The compilation of all content on this site is the exclusive property of HORNER APG and may be protected by U.S. and international copyright laws. All software used on this site is the property of HORNER APG or their software suppliers and may be protected by United States and international copyright laws. Nothing on this site should be construed as granting any license or right to such content or software.
COPYRIGHT AND TRADEMARK COMPLAINTS
The Horner APG respects the intellectual property of others. If you believe that your work has been copied in a way that constitutes copyright infringement on HORNER APG’s HORNER WEBMI, HORNER PUSH or Horner Portal, please notify us immediately by phone at 877-665-5666 or by mail at Horner APG 59 South State Avenue Indianapolis, IN 46201.
SITE TECHNOLOGIES
HORNER APG hereby disclaims any rights to trademarks, service marks, trade names, logos, copyrights, patents, domain names, or other intellectual property interests of third parties.
APPLICABLE LAW
By using HORNER APG’s HORNER WEBMI, HORNER PUSH or Horner Portal, you agree that the laws of the State of Indiana, without regard to principles of conflict of laws, will govern this Terms and Conditions of Use Policy and any dispute of any sort that might arise between you and HORNER APG regarding such Policy.
CHANGES TO THE TERMS
We reserve the right, at any time, to modify, alter, or update these Terms and Conditions of Use Policy without prior notice. Modifications shall become effective immediately upon being posted on our HORNER WEBMI, HORNER PUSH and Horner Portal. Your continued use of the HORNER WEBMI, HORNER PUSH and Horner Portal after modifications are posted constitutes an acknowledgment and acceptance of the Terms and Conditions of Use Policy and its modifications.
UPDATED April 25th, 2018
HOW TO CONTACT US
Please visit our Sales and Marketing website with any questions about this Terms and Conditions of Use Policy https://hornerautomation.com/contact-us/ or by mail at: Horner APG, 59 South State Avenue Indianapolis, IN 46201.
Return to the Top: WebMI Manual