Email Configuration 

See also: Networking and Communications
See also: GSM Configuration
Topic Menu
Email Overview
An electronic mail message consists of two components, the message header, and the message body, which is the email's content. The message header contains control information, including, an originator's email address and one or more recipient addresses. Usually additional information is added, such as a subject header field. This feature is designed to send email messages embedding real time data of the controllers and can be configured using Cscape.
Note:
-
The user needs to do Ethernet Module Enhanced Configuration from Hardware Configuration to use for Email over Ethernet. See Ethernet Configuration Overview.
-
The Email over Ethernet feature requires Cscape 9.0 or higher.
-
Email over GPRS configuration can be configured through Home > Messaging > GPRS.
-
User can add maximum of 32 contacts in the Directory list and can configure up to 128 outgoing messages.
Email Configuration
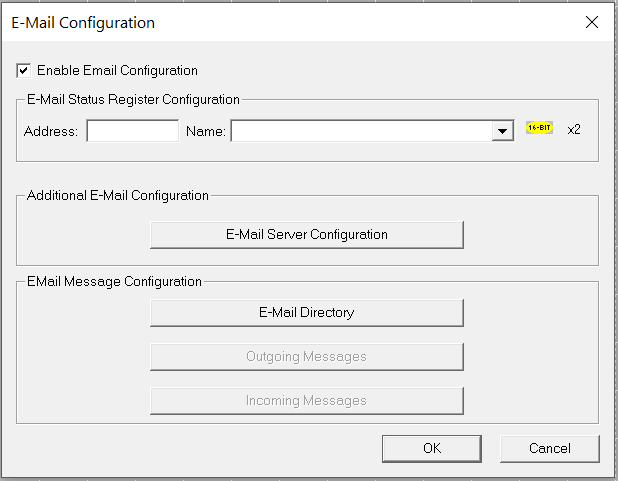
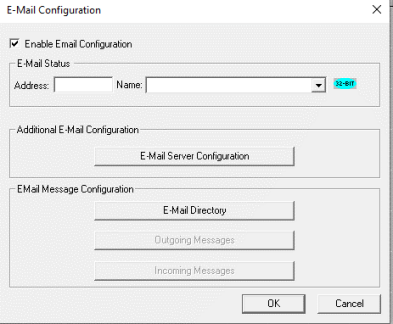
To open the Email Configuration dialog, Home > Program > Messaging > Email
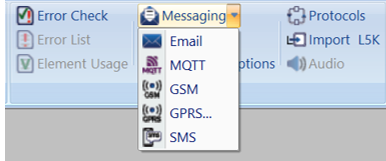
The following dialog will open, select Enable Email Configuration.
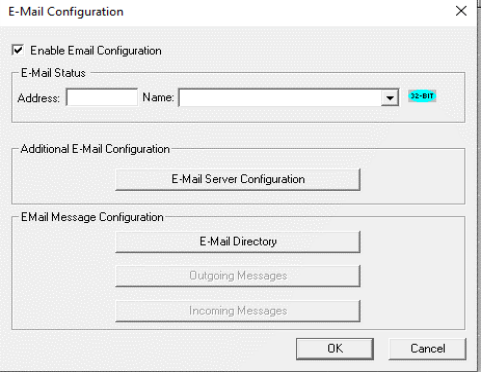
Email Status Register Configuration:
-
Address: Enter the starting register location to indicate the Email Status Register Details communication.
-
Name: Enter (or select) an I/O Name.
Selecting Additional E-Mail Configuration opens the following dialog:
Note: If the device has GPRS communication option board, emails can be sent over GPRS. For this, GPRS should be selected in the above dialog. See GPRS Configuration for more details.
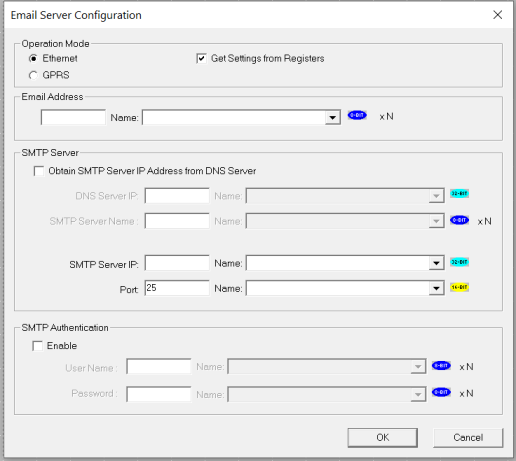
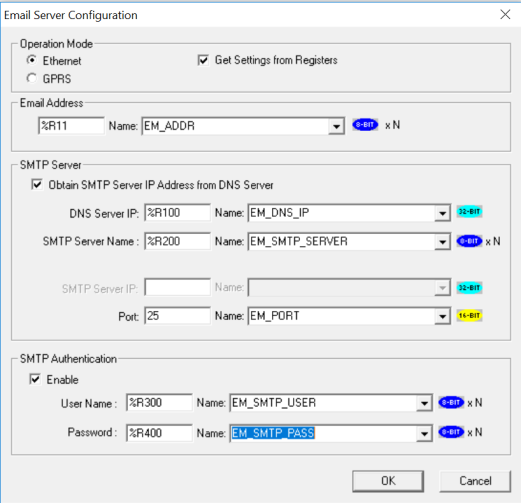
To setup email configuration through registers, Get Settings from Register checkbox can be enabled. In this case the entire configuration data is taken from registers as shown below:
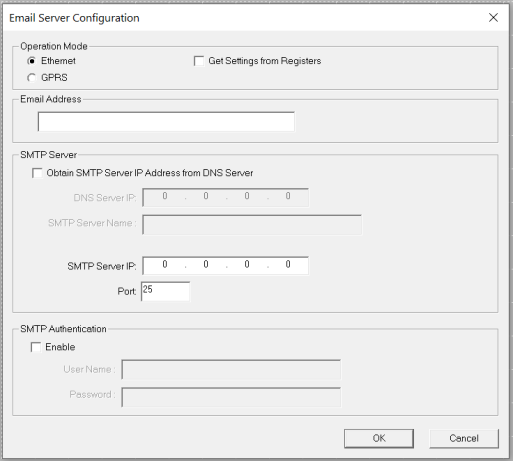
Email Address: The Email address of the controller can be configured here. If the user wants to provide email address through register, the Get Settings from Register checkbox can be clicked and register reference can be provided in E-mail Address edit-box. The register mentioned here should contain the email address followed by null termination![]() Null Termination - To place a NULL character (character code 0) at the end of ASCII data. Some functions require NULL Termination to be able to determine the end point of the ASCII data since that data may vary in length from one time to the next. or space.
Null Termination - To place a NULL character (character code 0) at the end of ASCII data. Some functions require NULL Termination to be able to determine the end point of the ASCII data since that data may vary in length from one time to the next. or space.
-
SMTP Server IP:The SMTP Server IP address of the email service provider needs to be provided here. In case SMTP server IP needs to be obtained from DNS server, select Obtain SMTP Server IP Address from DNS Server checkbox. This will enable DNS Server IP and SMTP Server Name edit-boxes. Configure these with the information provided by email service provider.
-
Port: The default port for email configuration is set to 25 but can be changed by the user if required.
-
Get Settings from Register: DNS Server IP and SMTP Server IP needs to be provided in 32-bit IP format in the defined register location. Port number needs to be provided in 16-bit numeric format at the defined register location. SMTP Server Name (if required) needs to be provided at the register mentioned followed by null termination or space.
-
The firmware for E-Mail also supports Login type of SMTP authentication. To use this feature, the Authentication SMTP checkbox should be checked. The user name and password for authentication needs to be provided here.
-
If Get Settings from Register: Username and Password needs to be provided at the register location mentioned followed by null termination or space.
Options for Configuring Email
OPTION A: Click on Email Server Configuration to configure email address, server address, and authentication.

OPTION B: If the user wants to provide the email configuration through registers, Get Settings from Register checkbox should be checked. In this case the entire configuration data is taken from logic registers.
Following considerations must be made when using registers for configuration.
-
DNS Server IP and SMTP Server IP need to be provided in 32-bit IP format in the defined register location.
-
Port number needs to be provided in 16-bit numeric format at the defined register location.
-
Email address needs to be provided at the register mentioned followed by null termination
 Null Termination - To place a NULL character (character code 0) at the end of ASCII data. Some functions require NULL Termination to be able to determine the end point of the ASCII data since that data may vary in length from one time to the next. or space.
 -
SMTP Server Name (if required) needs to be provided at the register mentioned followed by null termination or space.
-
User Name and Password (if required) need to be provided at the register location mentioned followed by null termination or space.
Once email server is configured, click OK, and return to the email
SSL / TLS Support
From Firmware 14.04 onwards, SSL / TLS support has been added. Email servers which support the following cipher suite can be configured in Cscape to send emails via Ethernet or GPRS.
Cipher Suite: TLS_RSA_WITH_RC4_128_SHA (0x0005)
Example: Gmail, Yahoo supports the above-mentioned cipher suite.
Email Server Configuration for SSL support in Cscape
In Cscape, select Programs > Messaging > Email, and the Email configuration window opens. Select Enable Email Configuration, configure email status register and select Email Server Configuration. Currently not all the Horner OCS units have a secure protocol for sending Email on an SSL/TLS mail server. There is also a misconception that the OCS with TLS 1.2 implemented can send securely on a Gmail account. The fact is it needs the TLS1.2 to be able to negotiate a connection with the server, but it still needs to send the message through a less secure means. This requires that the account security setting be set to enable (Turn On) less secure. This document will show how to setup a Gmail account to be able to utilize the mail function on the OCS. This is not an all-inclusive list of the OCS units.
Gmail on TLS 1.2
For Gmail
Server Name – smtp.gmail.com
Port: 465 (SSL required) or 587 (TLS required)
DNS Server IP: 8.8.8.8
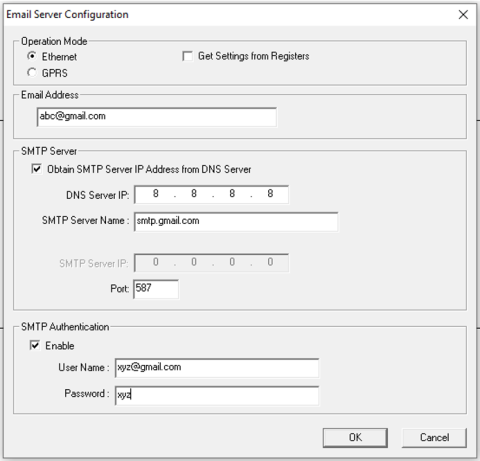
Gmail Account Setup
Configuration can be setup as shown or through registers. Once you have the program configured for Email it can be downloaded to the OCS. To use the Email, you will need to go to the Gmail account and turn “On” the security feature for “Less Secure App Access”, as shown below:

Once this is changed, Google will send a message to your Gmail account that needs your response that this is a change made by you. Once you have confirmed this change to Google, the controller should be able to send email. NOTE: As stated in Google security, Google will turn this feature off automatically if it’s not being used.
Yahoo Account Setup
Server Name – smtp.mail.yahoo.com
Port: 465 (SSL required) or 587 (TLS required)
DNS Server IP: 67.195.1.92
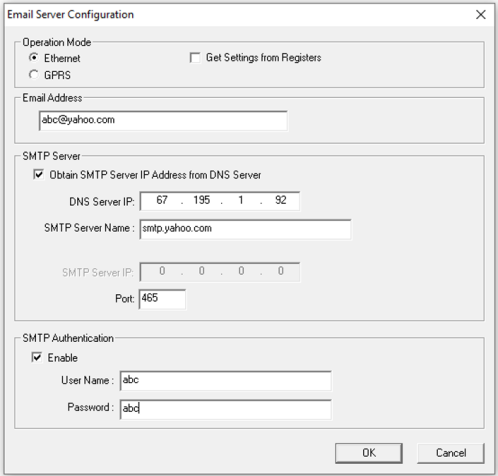
Click OK.
NOTE: For SSL / TLS email servers, default port is 587 and for other non-SSL servers it is 25.
Return to the Top: Email Configuration
Target Directory Settings
Home > Program > Messaging > Email > Email Configuration > Enable Email Configuration
Before creating Send Emails, a directory of email addresses needs to be created. Click on E-Mail Directory button to configure email addresses.
Note: The “Enable Email Configuration box must be checked. See below:
Email address configuration is very similar to SMS Address configuration with email addresses replacing phone numbers.

-
Add Contact: To add a contact. See the following screen Email Directory.
-
Modify Contact: If a contact is already added in the directory. (The user will see information about the contacts in the above screen.) To modify the contact, either double-click the row or highlight the row and click Modify Contact. The Modify Contact Information screen appears, where the contact can be modified.
-
Delete Contact: To remove a listing after highlighting the row.
New Contact Information
Group Name: Enter or select a Group Name.
-
It can contain characters A-Z, a-z, 0-9, and the _ underscore character.
-
The first character must be A-Z, a-z, or the _ underscore character.
-
Do not use spaces or special characters.
-
Do not use two consecutive underscore characters.
Email ID:
-
Either enter an Email ID or enter a register where the email ID is stored.
-
The Email address can be provided through register also wherever it is required to be changed the address in runtime. The register mentioned here should contain the email address followed by null termination
Null Termination - To place a NULL character (character code 0) at the end of ASCII data. Some functions require NULL Termination to be able to determine the end point of the ASCII data since that data may vary in length from one time to the next. or space.
Mail ID Name:If the Email ID is provided through register, the IP name also can be provided here.
Comments:Add description/comments for the email address here.
Click OK to see the contacts in the directory.
The following screen shows examples of contacts added to the directory:
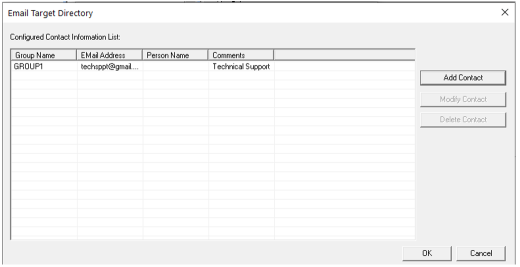
With the directory being created, the users are now ready to begin creating send email message formats.
Return to the Top: Email Configuration
Outgoing Emails Settings (SEND)
Emails sent from the controller to Groups
Home > Program > Messaging > Email > Email Configuration > Outgoing Messages
Once a Group Name and email address are added to the Email Target Directory, Outgoing Messages can be sent.
Note: Before creating send Emails, an Target Directory Settings needs to be completed.
Step 1: After creating the Email Target Directory, check the Enable Email Configuration box. Then select Outgoing Messages:
Step 2: Select Add Message.
-
Add New Message: To add a new Email message format (i.e. email body).
-
Modify Message: To edit a message that is already in the list. Either double-click the row or highlight the row and click Modify Message.
-
Delete Message: To remove a message after highlighting the row.
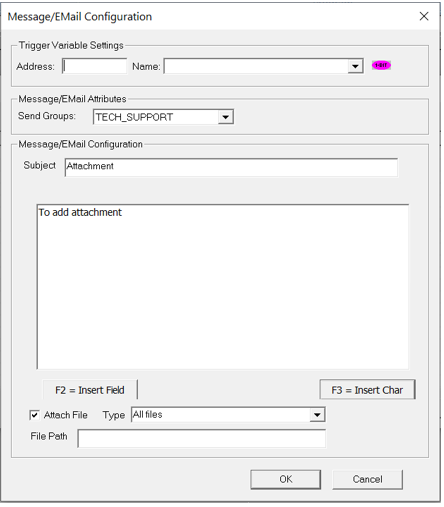
Step 3: Select Add New Message to open Message/Email configuration dialog.
-
Trigger Variable Settings: An event is needed to trigger an Email communication from the controller to the member(s) of a Group. Enter a bit reference in the Address field that (when set to HIGH) causes the Email message associated with the trigger to be sent to the specified Group member(s). An I/O name can be entered or selected in the Name field. On successful transmission of email, the trigger bit is made low by firmware. In case of error in transmission, the status register is updated, and firmware keeps on trying to send email till trigger bit is made low by the user.
-
Message/Email Attributes: Enter or select the group that the Email message is sent to.
-
Message/Email Configuration: Messages can contain text and register data values, which approved group members can read from the controller's data registers at runtime.
-
Enter the subject of the email communication.
-
Enter the body of email.
-
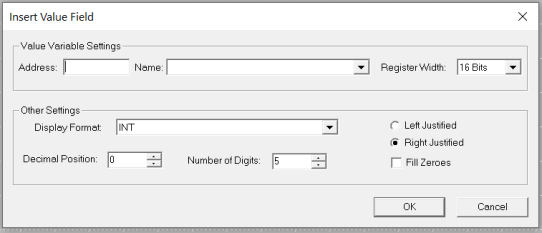
In order to edit/add register data values, click F2 = Insert Field button and configure the Insert Value Field screen shown below:
-
Insert Value Field
Value Variable Settings:
-
Enter a register reference where the data embedded in the email to send will be stored. An I/O name can be entered or selected in the Name field. Select Register Width also.
-
Up to 32 register value fields can be added to an email message.
Other Settings:
-
Select the Display Format from the dropdown. In the Decimal Position field, enter the position of the decimal point. Enter the number of digits in the Number of Digits.
-
For example: xx.xx shows that the decimal is in the 3rd position and the total number of digits (including the decimal) is 5.
-
Click the Fill Zeroes box and the Left Justified or Right Justified box if desired.
Insert Character in Email
Click F3 = Insert Char button or press F3 to place a character to be place in email body.
The following screen will appear:
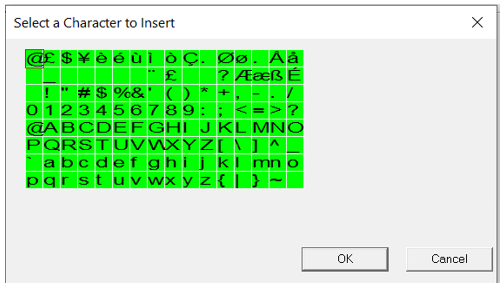
Click OK to return to the Email Configuration screen.
Return to the Top: Email Configuration
Attach File in Email
Home > Program > Messaging > Email > Email Configuration > Outgoing Messages > Add New Message
Attach File option in Email Configuration allows the user to attach files that are present in the removable media of the controller.
Type:
-
All Files: All the files present in the Removable Media folder specified in "File Path" are attached to the mail sent.
-
Latest File: The most recently created file in the Removable Media folder specified in "File Path" is attached to the mail sent.
-
Oldest File: The least recently created file in the Removable Media folder specified in "File Path" is attached to the mail sent.
-
One previous to the latest file: The second most recently created file in the Removable Media folder specified in "File Path" is attached to the mail sent.
-
Specified File: The file that is specified in "File Path" is attached to the mail sent. (Wildcards are not supported for "Specified File" type.)
File Path:
-
The path of full filename of the file to be attached in the format.
-
{Device}\{Path}\{Filename}
-
{Device} may be
-
The removable media (microSD or USB) or
-
If omitted the removable media card (A:) defaults.
-
{Path}
-
Specifies the path to use.
-
{Filename}
-
Applicable only to the specified file type. Specifies the filename to use.
Any error in the attachment will be sent with the mail as "Attachment Error: Error Code". NOTE: The number of entries (files and sub folders) in any folder should not go beyond 255 for attachments to work properly
See System Registers used with Removable Media in Removable Media in Advanced Ladder for Error code description of Email attachment.
Return to the Top: Email Configuration
Email Status Register Details
Home > Program > Messaging > Email
| Bit # | Error | Reason | Remedy |
|---|---|---|---|
| 1 | Invalid Configuration Error |
The user downloaded Cscape configuration is invalid. |
Check and re-download Email configuration. |
| 2 | Invalid IP or Port address |
Configured Email Server IP or Port address is incorrect. |
Verify configured Email server IP Port address |
| 3 | Socket Error | Internal TCP Resource Error | Reduce number of TCP connection in use by device and retry |
| 4 | Bind Error | Internal TCP Resource Error | Reduce number of TCP connection in use by device and retry |
| 5 | Connection Timeout Error |
Device is not able to connect specified Email server within 30sec of timeout value |
Check configured Email server name (or IP address) and Port address |
| 6 | Transmit Buffer Error | Internal Memory Resource Error | Reset the device and retry |
| 7 | Transmit Error |
Internal resource or connection break can cause this error |
Check configured Email server name (or IP address) and Port address |
| 8 | UDP |
Internal Resource Error | Reduce number of UDP connection in use by device and retry |
| 9 | DNS Error Response | Erroneous response received from DNS server | Check configured DNS server IP address and Email Server Name |
| 10 | DNS Response Timeout | No response received from DNS server | Check configured DNS server IP address |
| 11 | SMTP Command Timeout |
No response received from Email server for Email command sent |
Check configured Email server name (or IP address), Port address, Email address (To and From), Username and Password |
| 12 | SMTP Error Response |
Error response received from Email Server for Email command sent |
Check configured Email server name (or IP address), Port address, Email address (To and From), Username and Password |
| From Firmware 15.20 onwards: | |||
| 13 to 20 | SMTP Error State code | This field provides SMTP State (or command) code where Error occurred |
1= DNS Query State 2= DNS Response State 3=Establish Connection State 4=SSL Init 6=SSL Done Handshake 7=SSL Wait Write 8=SSL Handshake 9= HELO Command State 10= Authentication State 11= Username State 12= Password State 13= Sender Mail Address State 14= Receiver Mail Address State 15= Data Command State 16= Send Data State 17= Attachment 18= Send Data State 19= End Data State 20= Quit State 21=Waiting for Response |
| 21 to 32 | SMTP Server Error Response code |
This field provides SMTP Error response code received from SMTP server |
Details of different error codes can be found in RFC 821 and RFC 2554 documents. For example: ‘500’ Syntax error, command unrecognized. |
NOTE: When using the Email feature, the transmit trigger bit will typically be reset by the unit within 30 seconds of being set. If this does not occur the Error status will update to indicate the error which has occurred. If there is no status then either the Device is not in RUN mode, the Email feature is not configured, or an invalid Email configuration is downloaded.
Return to the Top: Email Configuration