Communications
See also: User Settings for Advanced Ladder Overview
See also: Advanced Ladder Logic Programming
Topic Menu
User Settings: Communications Overview
User Settings for theAdvanced Ladder with Register Based Addressing Editor and the Advanced Ladder with Variable Based Addressing Editor can be accessed from any one of the following options:
-
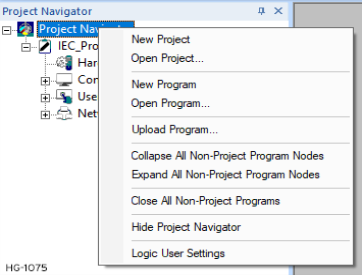
Option 1: Right-click on Project Navigator and select Logic User Settings from the option displayed.
-
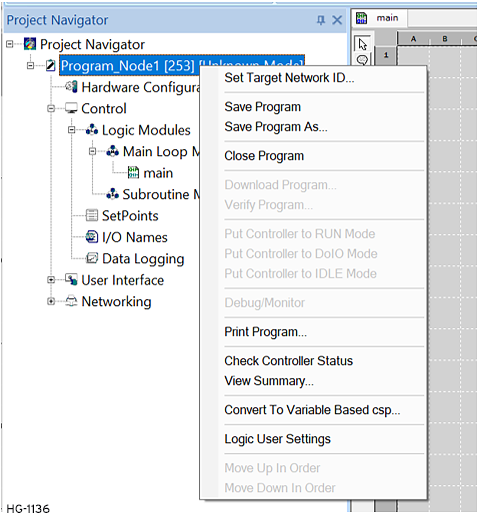
Option 2: Right-click on Program and select Logic User Settings from the option displayed.
Selecting the Communications tab brings up the following options:
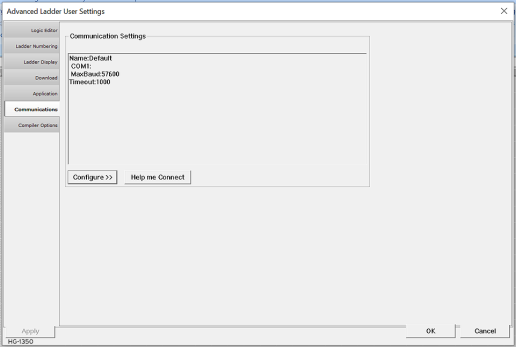
Communications Settings
Here, a preview of the configured communication setting will be displayed. Communication Settings can be done by using either of the following options:
-
Configure >>: By using this option user can have detailed communication settings like Baud Rate, Time out etc.
-
Help me Connect: This option is used for simplified communication settings where in it assists the user in connecting to a Local device.
Note: Cscape can communicate with a stand-alone controller or controllers connected to a CsCAN![]() Horner APG's proprietary network protocol that runs on the Bosch CAN network specifications. Prior to the advent of the OCS. network.
Horner APG's proprietary network protocol that runs on the Bosch CAN network specifications. Prior to the advent of the OCS. network.
Configure >>
Selecting Configure >> brings up the following Add Target dialog. Add Target is also accessible through the Project Navigator: Right-click on Program Name > Logic User Settings > Communications > Configure >> Add Target
Return to the Top: Communications
Add Target
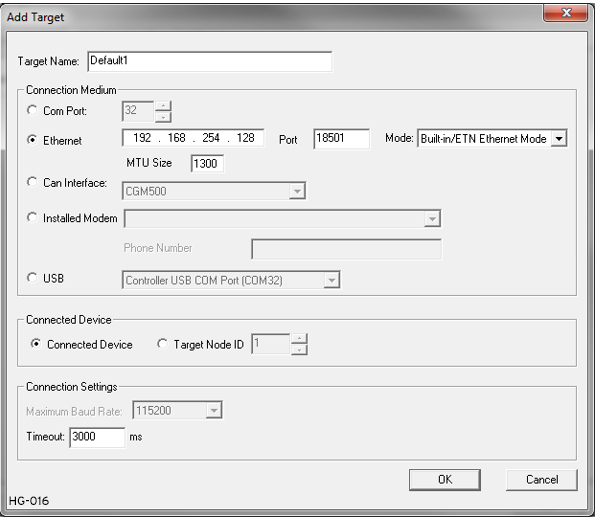
Target Name - Name for the connection. This is not a mandatory parameter to be filled, by default Cscape will populate ‘Default’ in the edit box. This name is not currently used in Cscape for anything but display in this location.
Connection Medium
-
Com Port: Selecting this option, Cscape will communicate over serial communication with the device. The port number can be configured here.
-
Ethernet: Selecting this option, Cscape will communicate over Ethernet.
-
IP Address (not labeled): Enter the IP address of the device. This may be the OCS itself or a router/firewall behind which the OCS is connected on a subnet.
-
Port: The CsCAN
 Horner APG's proprietary network protocol that runs on the Bosch CAN network specifications. Prior to the advent of the OCS. Protocol normally uses Port 18501 and all OCS devices use this port without the ability to change it. When connecting through a router/firewall, the port forwarding functions of the router/firewall may be used to route a different port number specified here to the IP address and port 18501 of the OCS on the subnet behind the router/firewall. This allows access to connect to multiple OCS devices behind a single IP address.
 -
Mode:Depending on the OCS Ethernet connection, select the appropriate mode as follows:
-
Built in / ETN Ethernet Mode: Select this option if the device has an on-board Ethernet port.
-
HE – GSM GPRS Mode: Select this option if communication with XL series controller on GPRS is required and the device has GSM modem installed in XL series controller. NOTE: For GPRS connectivity, GPRS configuration from Home > Messaging > GPRS needs to be done.
-
HE – XEC Ethernet Mode: Select this option if the device has the Ethernet comm. option board installed in a XL series controller.
-
MTU Size: This indicates the packet size that is transferred at once over an Ethernet network. Default is 1500, which is the maximum setting and is commonly used. Consult IT personnel for an MTU size that should work on the network to which the OCS is connected. 1300 is another MTU value that networks are often limited to.
-
NOTE: The controller should support the type of connectivity selected and configured for Ethernet communication.
-
-
CAN Interface: Selecting this option, Cscape will communicate over CAN. This option requires additional Hardware to be installed with the PC to be able to do so. Select the type of hardware installed from the drop-down. Available options:
-
CGM500
-
ESD Card
-
Kvaser USB / CAN
-
Sounthein USB / CAN
-
-
Installed Modem: Selecting this option, Cscape will communicate to the device through the internal modem of the computer. Cscape will automatically detect the internal modem attached with the PC and list it in the attached drop down. User can select modem and telephone number for the target controller. NOTE: Cscape will do the necessary initialization for the selected internal modem.
-
USB: Selecting this option, Cscape will communicate over USB. Devices and USB to serial converters are recognized and can be specifically selected. NOTE: If attached devices are not shown in this drop-down, it indicates that those devices are not recognized properly by the Windows operating system. .The drivers need to be fully installed or updated using the Windows Device Manager. Once properly installed, OCS devices will display as "Controller USB Com Port" or similar. Newly attached or updated devices will not refresh in this drop-down until exiting this window and reopening.
Connected Device
It is possible to use the pass-through programming capability of the CsCAN protocol to connect to an OCS different from that being specified by the other options within this configuration. For example, a serial or Ethernet connection exists between the Cscape PC and one OCS, and a working CsCAN connection exists between that OCS and other OCS controllers.
-
Connected Device: Connect directly to the device specified in this configuration.
-
Target Node ID
Usually refers to the ID of the device on a supported CAN, such as CsCAN, CANopen, etc. Each device must have a unique network ID. Also called Node ID.: Connect to the OCS specified in rest of this configuration but set the Target ID to the address specified here.
Connection Settings
-
Maximum Baud Rate: Select the baud rate for serial communication.
-
Timeout: Set the communication timeout.
-
When using the Connection Wizard , the Timeout will automatically be set to a predetermined time based on the connection type.
-
Suggested timeouts for solid serial and USB connections: 2000-3000ms
-
Suggested timeouts for direct Ethernet connections: 2000-5000ms
-
Suggested timeouts for Ethernet connections over Internet or Cell Modem connections: 10000-45000ms
Note: Set a larger timeout for GPRS and Internal modem communication configuration.
-
Help Me Connect
Selecting Help me Connect button, Connection Wizard window opens up as shown below:
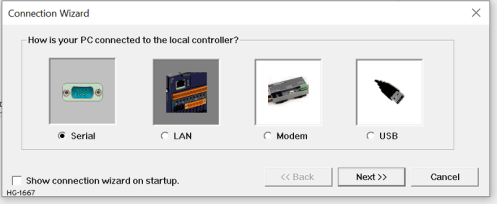
See Connection Wizard for more details.
Return to the Top: Communications