Logic Modules in Advanced Ladder 
See also: Advanced Ladder Logic Programming
Topic Menu
Logic Editing Overview

|
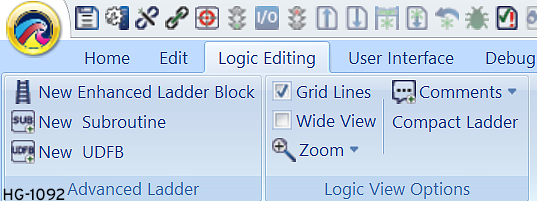
Grid Lines |

|
Wide View |

|
Zoom |

|
Comments: Icon/Full |
Logic Modules can be accessed two ways:
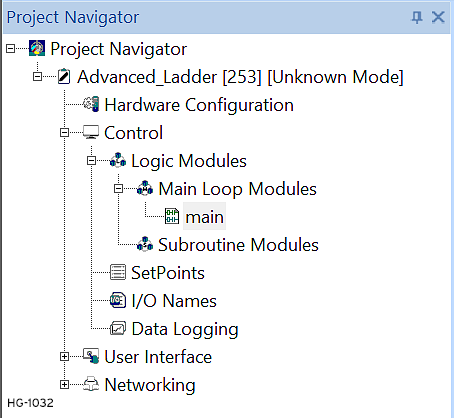
- Option 1: Through the Project Navigator: Ensure the Project Navigator is open:Home > View > Project Navigator
- Option Two: Through the Menu Ribbon in the Logic Editing tab.
Return to the Top: Logic Modules in Advanced Ladder
Main Loop Modules - Advanced Ladder 
Using multiple logic modules, different aspects of OCS operation can be segregated in separate control modules to simplify the logic function. The user can configure the compilation sequence of multiple modules in main loop module area of a program by accessing the Execution Sequence Configuration dialog. The Control feature allows Main Loop, Subroutine, and UDFB (Variable Based only) modules to be created. To better organize the application programs, the logic can be divided into multiple modules. These modules can be main loop or subroutines modules as per the requirement of the application.
Note: Creating multiple modules is not available from Classic Cscape mode.
A Maximum of 255 Enhanced Modules can be created for each program in all which includes main loop modules and subroutine modules. There is no limit on the number of modules that can be added to the tabbed list at one time and depends on the PC resources. Since limited tab space is available, all opened logic blocks may not be visible. In order to view any hidden logic block, click arrow button on the right top corner and select the required logic block from the open logic blocks list shown.
If it is required to edit a logic block that is currently closed [closed logic blocks will not be listed in the list shown when down arrow button is clicked], double click on the logic block’s node in project navigator. Open logic blocks can be closed using the ‘x’ button on the right top corner of the work area.
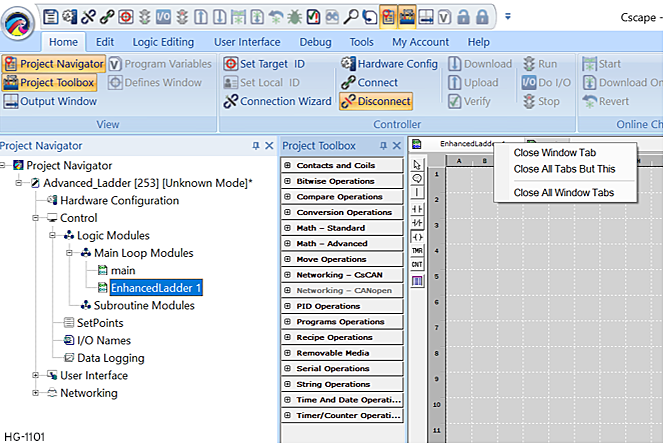
Alternatively, the user can right-click in the tab area on any logic block name to access the quick menu for:
-
Close Window Tab (closing the currently active tab)
-
Close All Tabs But This (closing all tabs except the active tab)
-
Close All Window Tabs (close all open tabs)
Main Loop Right-Click Options
Creating Multiple Logic Blocks
Using multiple logic modules, different aspects of OCS operation can be segregated in separate control modules to simplify the logic function. User can configure the compilation sequence of multiple modules in main loop module area of a program by accessing the Configure Execution Sequence dialog.
Every program is created with a default main loop module labeled main. New logic modules can be added to the program by:
-
Selecting Logic Editing > Advanced Ladder > New Enhanced Ladder Block from the main menu. This will create a new logic module under Main loop modules.
-
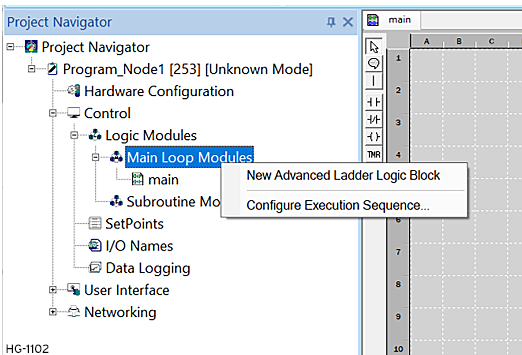
Open the Project Navigator through the Home > View menu. Expand the Control tree and the Logic Modules node of the program. It will open two nodes Main Loop Modules and Subroutine Modules. Right-click on Main Loop Modules node to create a new Advanced Ladder Logic Block.
A new tab labeled EnhanceLadder 1 appears along with the main in the Logic editing area of the Cscape. Click on this tab to start editing logic.
New Advanced Ladder Logic Block 
Select to make a new Main Loop Logic Block.
Configure Execution Sequence
Execution Sequence Configuration can be accessed either by right-clicking on the Main Loop Modules or right-clicking on individual modules as shown below. Select Move Up in Order or Move Down in Order.
Selecting Configure Execution Sequence gets the user to the below displayed window:
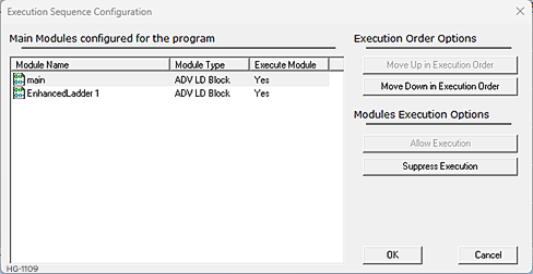
The user can change the execution order of the programs by using either Move Up in Execution order or Move Down in Execution order buttons.
-
Move Up in Execution Order: Moves the selected program one step up the execution order.
-
Move Down in Execution Order: Moves the selected program one step down the execution order.
The user can also include/exclude a logic module in the main loop modules section from execution sequence by using Allow Execution/Suppress Execution options. This option can be selected either through Execution Sequence Configuration window or by right-clicking on any modules.
Any Module which is excluded from Compilation will have a RED mark indicated on the module as shown below:
![]()
Main Loop Modules - Right-Click
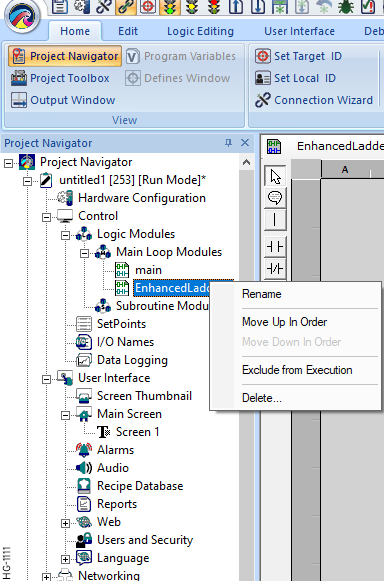
In the Project Navigator, right-clicking on the newly added Enhanced Ladder Logic Block will show the below mentioned options:
-
OEM Protect: Can be used to mark sections of code in Cscape as proprietary. These sections are then password protected from viewing or editing. See also: OEM Sections in Security & Passwords
-
Rename: Allows Block to be renamed.
-
Move Up in Order: Moves the selected module one step up the execution order.
-
Move Down in Order: Moves the selected module one step down the execution order.
-
Exclude from Execution: Excludes the selected module from being compiled/executed during runtime.
-
Delete: Any Block that is not required can also be deleted from the Logic Module by right-clicking on the block and select Delete.
Return to the Top: Logic Modules in Advanced Ladder
Subroutine Modules - Advanced Ladder 
The logic modules now allow specific subroutine blocks to be created which may be called either from the main loop modules, or from each other. The subroutine modules are modules which are not included in the main PLC scan and must be explicitly called from either the main modules or from each other. There is currently no provision for passing parameters to the Subroutine blocks – any values required to be passed into or out of the subroutines must be allocated to OCS Registers. It should be stored prior to and loaded back after the subroutine is called .
Rules for Labels, Calls and Jumps
-
Calls to subroutines may only be made to subroutines within the same module or to the start of a separate subroutine module.
-
Jumps can be done only to the labels of the same module in which the Jump is located.
-
A subroutine module may be used recursively – but watch out for nesting levels.
-
A subroutine module must end with a <RETURN> command, but additional <RETURN>s may be added within the subroutine body if required.
Creating Subroutine Modules 
New subroutine modules can be added to the program by:
-
Option One: Selecting Logic Editing > Advanced Ladder > New Enhanced Ladder Subroutine from the main menu. This will create a new logic module under Main loop modules.
-
Option Two: Open the Project Navigator through the Home > View menu. Expand the Control tree and the Logic Modules node of the program. It will open two nodes Main Loop Modules and Subroutine Modules. Right-click on Subroutine Modules node to create a new Advanced Ladder Subroutine.
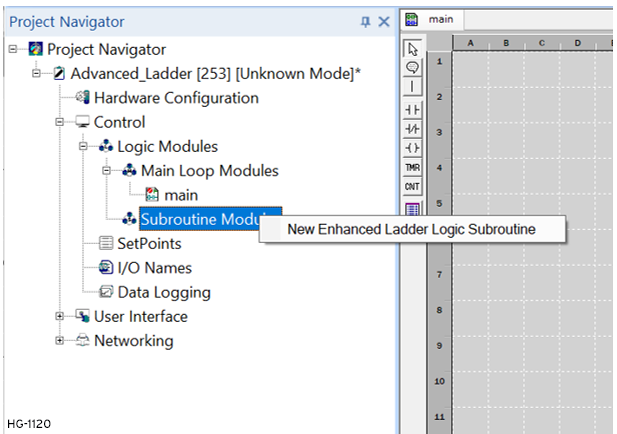
After adding the module the module name will automatically be selected for editing.
Subroutine Module Right-Click
In the Project Navigator, right-clicking on the newly added subroutine module will show two right-click options:

-
OEM Protect - Can be used to mark sections of code in Cscape as proprietary. These sections are then password protected from viewing or editing. See also: OEM Sections in Security & Passwords
-
Rename - The blocks can be renamed as desired by right-clicking on the block and select Rename. Changing the name will automatically update all references to the original module name to the new one.
-
Delete - Any Block that is not required can also be deleted from the Logic Module by right-clicking on the block and select Delete.
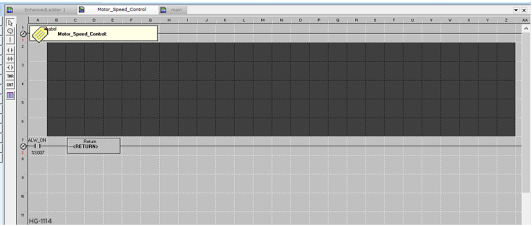
Restricted Editing Area
Editable Area: User can enter the desired logic only in the dark gray areas indicated below. This is the area provided by Cscape by default when the block is created. This region can however be increased/decreased by inserting blank lines and then editing the logic as desired.
Return to the Top: Logic Modules in Advanced Ladder
UDFB Modules - Variable-Based Advanced Ladder 

See also: Variable Based Advanced Ladder

|
Intro to UDFB Modules |

|
Hands on: UDFB Modules |

|
Creating a UDFB from Scratch Using Cscape |

|
Performing Sequential Stepper Moves with Horner OCS |
From Cscape 9.90 SP3 onwards, UDFB has been supported in the Variable Based Advanced Ladder editor. These blocks are callable from all the other block types. UDFB modules can have private and local variables which will be allocated with unique storage. Hence calling the blocks from two different places will operate on different private and local variables.
New UDFB modules can be added to the program by:
-
Option One: Selecting Logic Editing > Advanced Ladder > New Enhanced Ladder UDFB from the main menu. This will create a new logic module under Main loop modules.
-
Option Two: Open the Project Navigator through the Home > View menu. Expand the Control tree and the Logic Modules node of the program. It will open three nodes Main Loop Modules, Subroutine Modules, and UDFB Modules. Right-click on UDFB Modules node to create a new Enhanced Ladder Logic UDFB module.
UDFB Modules - Right-Click Options
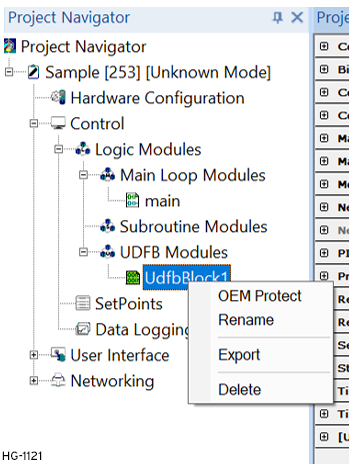
Following options are available on right-clicking UDFB Modules created - OEM Protect, Rename, Export and Delete.
-
OEM Protect: Select this option to Protect/Unprotect OEM section of the ladder in UDFB Module. See also: OEM Sections in Security & Passwords
-
Rename: Select this option to rename the selected UDFB module to a meaningful name.
-
Export : Select this option to Export UDFB modules so that the same module can be used in another program. While selecting Export option below dialog will pop up:

Select YES if the module to be exported as fully protected so that Logic will not be visible after Import. Select NO if the module to be exported is not to be fully protected. The UDFB module exported will get saved with the extension as “*.CPU”
-
Delete : Select this option to Delete the selected UDFB Module.
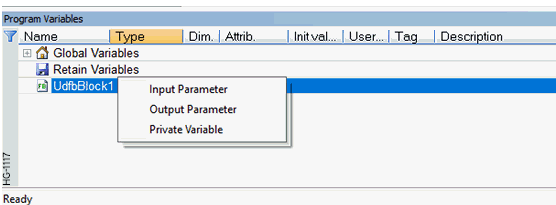
Creating Variables in UDFB
Three types of variables can be created in UDFB Blocks:
-
IN - Input parameter of a UDFB
-
OUT - Output Parameter of a UDFB
-
Private Variable - Only available within that UDFB
Variables can be created by right-clicking on created UDFB module and selecting Add Variable or “Insert” key on the UDFB Modules under Program Variables.
Debugging UDFB Logic Modules
For this to be operational, user need to select "Support Array of structures" in Editor options.
For Example: In the below UDFB block, values 10 and 20 are given as inputs, in order to debug this block, right-click on the block and select Open UDFB.
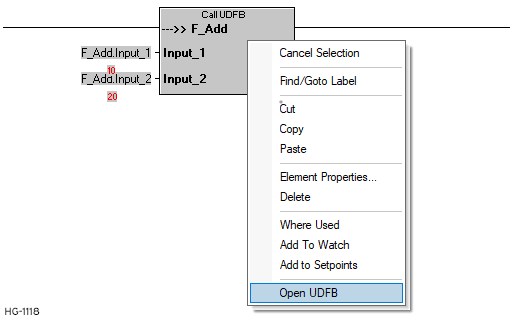
Note: UDFB can be nested i.e., calling a UDFB inside a UDFB up to 8 levels deep. If more than 8 levels of nesting are attempted, the controller will stop and the logic error flag in the diagnostics will be set. UDFB can be called only in increasing order i.e UDFB1->UDFB2->UDFB3 etc. UDFB1 cannot be called from UDFB.
Return to the Top: Logic Modules in Advanced Ladder