Variable Based Advanced Ladder 
See also: Advanced Ladder Logic Programming
Topic Menu

|
Intro to Tag-Based (Variable-Based) Advanced Ladder Logic
|

|
Create and Edit Cscape Tag-Based (Variable-Based_ Advanced Ladder Logic
|
|
|
Cscape 10 Program Downloads
|
New Variable-Based Advanced Ladder Program
Cscape Icon
Variable Based Advanced Ladder mode can be created when creating a new program. There are several different ways to start a new Cscape program.
-
Option 1: Create a new program through the Cscape Icon. Select New.

-
Option 2: Create a new program through keyboard shortcut - Ctrl+N.
-
Option 3: Create a new program through Project Navigator or a Project Node. Right-Click on Project Navigator or a Project Node to open the following menus:
Project Navigator
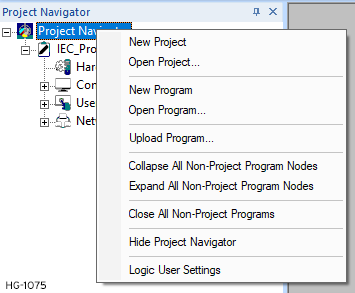
Select New Program.
The Editor Selection Type screen will appear:
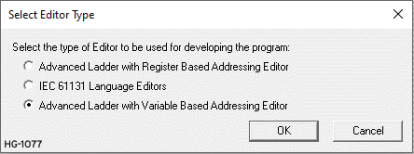
Here instead of assigning registers and bits when configuring the ladder blocks, graphics objects and so on for then system variables are created with a variable name in a ‘Program Variables’ window and then assigned to the ladder blocks. Registers will be automatically assigned to the variables by the Cscape Ladder compiler.
Return to the Top: Variable Based Advanced Ladder
Declaring Variables
Creating Variables
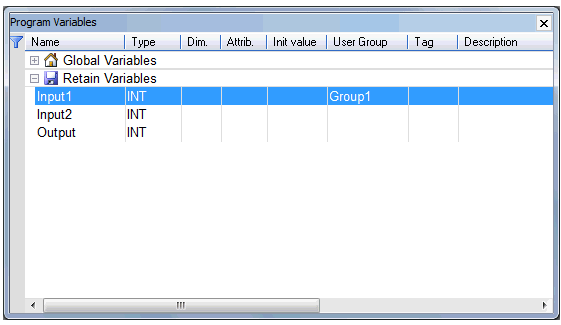
Hit INSERT key in the Program Variables Window to create a new variable in the selected group. The variable is added at the end of the group. Variables are created with a default name. The user can rename a new variable or change its attribute using the variable editing grid.
Predefined Structures 
Predefined Timer/Counter Structure
Predefined Timer/Counter structure are added in program variables. There are two predefined Timer/counter structures available and they are:
-
TimerCounter16 - for 16 Bit Timers/Counters.
-
TimerCounter32 - for 32 Bit Timers/Counters.
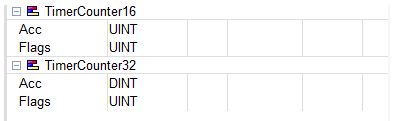
Each structure has 2 variables:
-
Acc - To store Timer/Counter accumulator values.
-
Flags - To store Timer/Counter flag values.
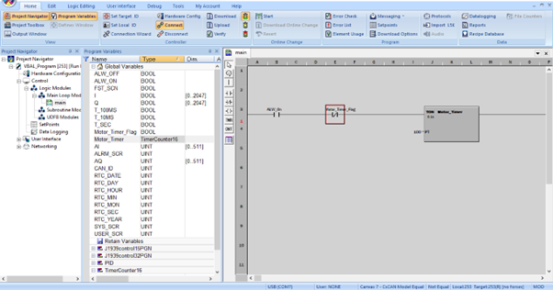
Instead of creating separate variables for each Timer/Counter in the application, user can use the predefined Timer/Counter structure as follows:
Predefined PID Structure
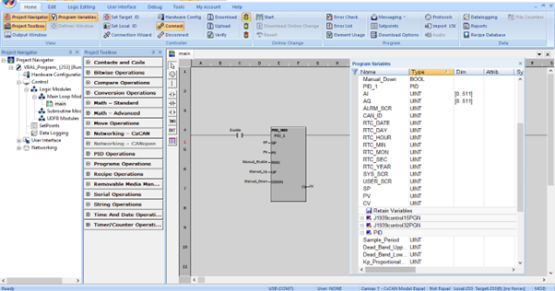
Predefined PID structure is added in program variables as follows:

PID_Address field in PID ladder block can be configured using this structure as follows. The structure has an array of sixteen UNIT variables.
Note:
-
From Cscape 9.90SP3 onwards, Timer/Counter and PID blocks will accept structure instance in the address filed, not the first member of it. In Cscape program which are created using version 9.90SP2 or older using structure for Timers/Counters or PID, user has to change the address field to structure instance instead of first element of structure, else Cscape will show error “Enter valid Address”.
-
User defined Tag for structure variable is ignored.
Defining Structures
To create a data structure which can be used as a data type when creating variables, right-click on the program variables window and select ‘Add Structure’. Each structure is represented as a group in the window. Enter the members of the structure in its group in the same way as variables are entered in another group. New data structures are created with default name. Right-click on the structure and select 'Rename' to change its name. An instance of the structure can be created within another structure if the structure is already defined.
Naming a Variable
To change the name of the variable, enable the modification mode in the grid and move the cursor to the selected "name" cell. Then press ENTER or hit the first character of the new name. The name should be entered in the pop up text field. Hit ENTER to validate the name or ESCAPE to cancel the change.
A variable must be identified by a unique name within its parent group. The variable name cannot be a reserved keyword of the programming languages and cannot have the same name as a standard. A variable should not have the same name as a program or a user defined function block.
The name of a variable should begin by a letter or an underscore ("_") mark, followed by letters, digits or underscore marks. It is not allowed to put two consecutive underscores within a variable name. Naming is case insensitive. Two names with different cases are considered as the same.
Sorting variables
At any moment the user can sort variables of a group according to their name, type or dimension. For that the user simply needs to:
-
Move the cursor to the header of the group.
-
Click on the name of the wished column.
Cscape always keeps the original order of declared variables. Each time user inserts a new variable or expands/collapses a group, the original sorting is re-applied.
Mapping a variable to an OCS register
Cscape enables the user to freely enter for each variable two attributes that describe the variable:
-
The "Tag" is the address of the variable that can be displayed together with the variable name in graphic languages. The variable address is associated with the Memory Area of the OCS.
-
The "Description" is a long comment text that describes the variable.
To change the tag or description of a variable, enable the modification mode in the grid and move the cursor to the corresponding cell. Then press ENTER to enter the new text.
Variable list - Active grid
Hit SPACE bar to enable or disable the active grid.
The Program Variables Window enables the user to enter information in each cell of the active grid. At any moment, the active grid can be activated (each cell can be edited independently) or disabled (full row is highlighted) by selecting the variable and pressing space. This can also be achieved through the 'Enable Changes' right-click option of the selected variable.
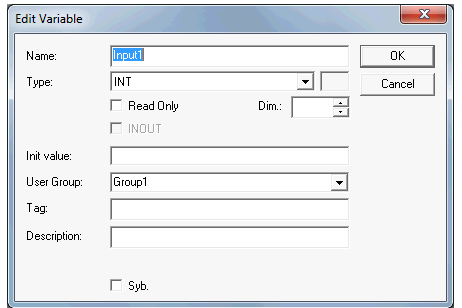
Press the ENTER key when the grid is inactive to open the variable setting box.
At any time, the user can drag with the mouse to drag the column separators in the main grid header for resizing columns.
How to Assign Variables
After dragging any ladder block and placing on the drawing area, the properties window opens up as shown:
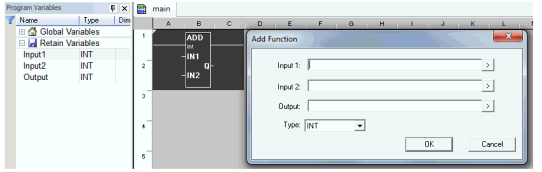
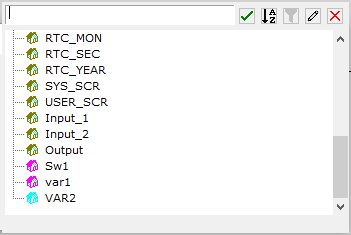
Select ‘ > ’ in the properties window, it lists the tags that had been created in the variables window
Select the required variable tag and click on the check button or press Enter. The selected variable will be assigned to the corresponding inputs.
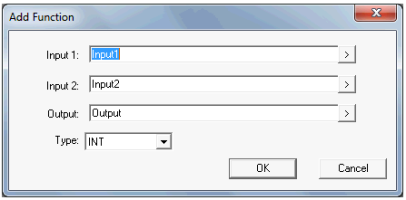
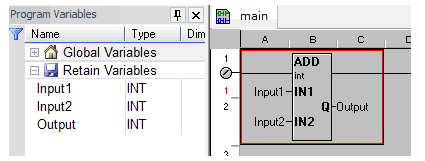
Click on OK and tags assigned will appear as shown:
Return to the Top: Variable Based Advanced Ladder
Auto Fill Variables
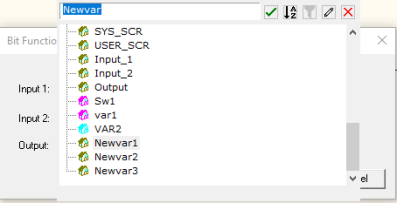
From Cscape 9.60 onwards, Auto Fill functionality for configured variables is supported in Variable Based Advanced Ladder and IEC editors. While assigning variables to input/output, just enter the first character (case sensitive) and full name will be displayed.
Return to the Top: Variable Based Advanced Ladder
Variable Based Advanced Ladder
Files to Allow Loading Default I/O Names
From Cscape 9.90 onwards, IO names can be loaded from XML file.
This feature allows user to import IO variables from XML file. IO variables XML file “IOVariables.xml” is created inside Cscape installed folder. To import program file from XML file, user has to edit this file and add variables. Each variable name and type are mandatory. Dimension is optional field, if dimension is not used then it will be 1. If dimension is greater than 1 initialization value is not allowed; init, attr, usergroup and desc are optional fields and if omitted will be left blank.
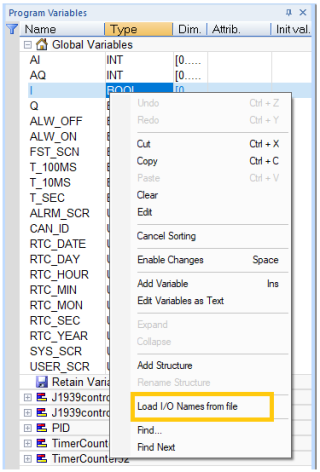
Right-click on the Global/Retain Variables window and select Load I/O Names from file option. Select the edited XML file to load the variables.
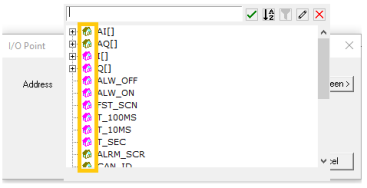
Color Coded Icons
From Cscape 9.90 SP9 onwards, support to color coded Icons based on the Datatype of the Variable in the Variable selection Tree has been added.
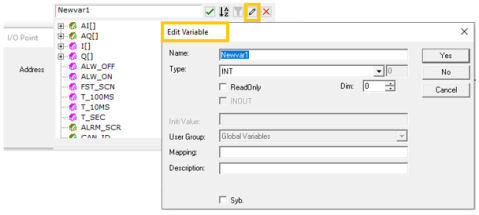
Edit Button in Variable Selection Window
From Cscape 9.90 SP9 onwards, an edit button which gives user the ability to edit a particular variable directly from the Variable selection window has been added
Note:
-
Bit arrays must be tagged with registers.
-
The following ladder blocks must be tagged with registers - Multishift Bit, Multi rotate Bit, Modbus Slave, Modbus Master, Alarm Block and Indirect Move blocks.
-
For String Blocks (for example: String Move/String Compare), the configured maximum length size should be 2 bytes less than the array size.
-
Right-clicking "Add to Data watch" will not add all the source and destination registers during Debug mode. To add all the registers in the buffer to the watch window, add them before entering debug mode.
-
For data arrays, the user can give a range within the array that needs to be added in data watch. For example, - src[0]-[10] etc.
-
Protocol dlls, Devicenet Scanner and J1939 modules do not support tag addressing. (All variables used in these modules should be fixed to physical address in the program variable window and the register references used in the appropriate configuration sections).
-
It is advised to configure variables/tags under Program Variables > Global Variables.
-
Structures cannot be mapped on user tags (tagging is ignored when there are structures).
-
Limitation - User cannot use variables (from Array of integer) bitwise. For Example - MyArray[1].1:=true;
-
Cscape allocates registers automatically while compiling for variables that are not tagged in Variable based and IEC programming languages. So, whenever user adds new variables or delete or modify existing variable the memory allocation may get changed.
For example, a program having counter with variable as “counter 1” which is not tagged by user is tagged to Register %R300 by Cscape automatically while compiling and the counter is working as expected.
When user adds a new timer block or any ladder block to the existing program with variable as “Timer1” without tagging Register there might be chance that “Timer” variable will get allocate to %R300 and already existing counter will get allocated to new register %R310. In this case functionality of both Timer and counter will work as expected but variable “counter1” may have value of %R310 which was there before download
To overcome this either user can clear all the register values and run the application or clear the specific variable.
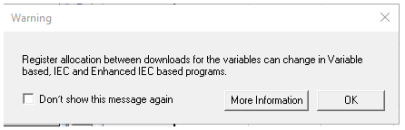
Warning message has been added in Cscape to alert user while downloading the application for change in Register allocation between downloads
-
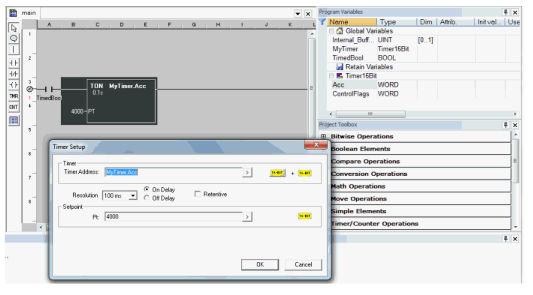
Timer blocks requires a Timer Data structure to be added in order to handle the conflict in addressing a 16 - bit timer block. Example: when using advanced tag with addressing, the timer block requires user to supply a 16-bit variable. When used a variable defined as a 16-bit type, at runtime the timer (requiring 32-bits) will overwrite the next adjacent 16-bit variable that Cscape happens to place at the next address.
An example screenshot of handling the issue is as below:
Refer to Project Toolbox for Advanced Ladder for individual ladder block functionality.
Return to the Top: Variable Based Advanced Ladder
Editing Variables as Text
As an alternative to the user friendly grid for editing variables, it is possible to declare variables as text. Text editing applies to all the variables of a group. During text editing, the group and all its variables are locked in the grid so that no change can be entered from other windows.
Syntax available for describing variables:
| XML Tags |
An easy XML structure using tags and attributes |
| CSV Format |
CSV format (separator: semicolon) |
To edit a group of variables as text, select the group in the program variables window. Right-click and select 'Edit Variables as text'. The Program Variables window goes blank and Logic editing area shows 3 tabs namely IEC format, XML format and CSV format. The user should select the appropriate tab in order to add variables.
On pressing the 'X' in the logic editing area, the user will be asked for saving. If the variables are saved, the same will be shown in Program Variables window. To edit a group of variable as text, select the corresponding tab ("IEC", "XML" ou "CSV") at the bottom of the editing window, and then double click on the group name in the explorer pane.
Note:
-
Bit arrays must be tagged with registers.
-
The following ladder blocks must be tagged with registers - Multishift Bit, Multi rotate Bit, Modbus Slave, Modbus Master, Alarm Block and Indirect Move blocks.
-
For String Blocks (For example: String Move/String Compare), the configured maximum length size should be 2 bytes less than the array size.
-
Right-clicking "Add to Data watch" will not add all the source and destination registers during Debug mode. To add all the registers in the buffer to the watch window, add them before entering debug mode.
-
For data arrays, the user can give a range within the array that needs to be added in data watch. For example, - src[0]-[10] etc.
-
Protocol dlls, Devicenet Scanner and J1939 modules do not support tag addressing. (All variables used in these modules should be fixed to physical address in the program variable window and the register references used in the appropriate configuration sections).
-
It is advised to configure variables/tags under Program Variables > Global Variables.
Return to the Top: Variable Based Advanced Ladder
XML Tags
The user can describe variable using a simple XML structure, where each variable is described as an XML tag. The file must fit the basic XML syntax. Values of tag attributes must be entered between double quotes. Characters < > " ' & are reserved to XML and cannot appear in values of tag attributes.
Instead, the user should use the following sequences:
| < | < |
| > | > |
| " | " |
| ' | ' |
| & | & |
Below is the tag structure for variable declaration:
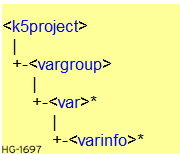
(the "*" mark indicates that the tag can appear 0 or more times)
The rest of this page describes the format and meaning of each tag:
<k5project>
This tag must be entered at the top level and is unique. It is reserved for extensions (enhancement of the XML structure) and specifies the version of the syntax. Its attributes are:
| Version | Reserved for future extensions. This attribute is mandatory and must be "1.0". |
The <K5Project> tag contains one <vargroup> tag.
<vargroup>
This tag must appear with the <K5Project> and contains all <var> tags for variables of the group. In this version, the tag has no attribute (the name of the group is implicit)
<var>
This tag describes the basic definition of one variable. Its attributes are:
| name |
Symbol of the variable. This attribute is mandatory. |
| type |
Name of the data type of the variable This attribute is mandatory |
| len |
Maximum length if the data type is STRING. This attribute is mandatory for STRING variables, and should not appear for other data types |
| dim |
Dimension(s) if the variable is an array. There are at most 3 dimensions, separated by commas. This attribute is optional. |
| attr |
Attributes of the variable, separated by commas. Possible values are: IN : INPUT parameter (for UDFBs only) OUT : OUTPUT parameter (for UDFBs only) external : External variable constant : Variable is read only. This attribute is optional. |
| init |
Initial value of the variable Must be a valid constant expression that fits the data type. This attribute is optional. |
The <var> tag contains zero or more <varinfo> tags.
<varinfo>
This tag indicates an additional info for the variable it belongs to. Its attributes are:
| type |
Type of information contained in the "data" attribute. Possible values: tag : variable tag (short comment) desc : description This attribute is mandatory. |
| data |
Data specified by the "type" attribute, in text format. This attribute is mandatory |
CSV Format
Using CSV format, each variable is defined on one line of text. Each component of the variable definition is entered as one CSV element. CSV elements are separated by semi-colons. Each element is written between double quotes. A double quote within an element is represented by two double quotes. CSV format is an easy way to exchange variable declaration with spreadsheet applications.
It is not mandatory that all elements (all columns) appear in the text. The first line must contain the list of columns used, using the following keywords:
| name |
Symbol of the variable. This attribute is mandatory. |
| type |
Name of the data type This item is mandatory, and must appear before len, dim and init columns. |
| len |
String length if the data type is STRING. This item must be empty for other data types. |
| dim | Dimension(s) if the variable is an array. There are at most 3 dimensions, separated by commas. |
| attr |
Attributes of the variable, separated by commas. Possible values are: IN : INPUT parameter of a UDFB OUT : OUTPUT parameter of a UDFB external : external variable |
| RO |
if "YES" indicates that the variable has the read-only attribute (Note: The user can also use "TRUE" or "1" value) |
| init |
Initial value of the variable. Must be a valid constant expression that fits the data type. |
| tag |
tag (short description text) |
| desc |
description text |
Below is an example of CSV text for the declaration of 3 variables, with some columns missing:
"name","type","len","attr","RO"
"MyVar","BOOL","","","NO"
"ExtVar","DINT","","external","YES"
"MyStr","STRING","10","","NO"
Return to the Top: Variable Based Advanced Ladder
Conversion to Variable-Based Advanced Ladder
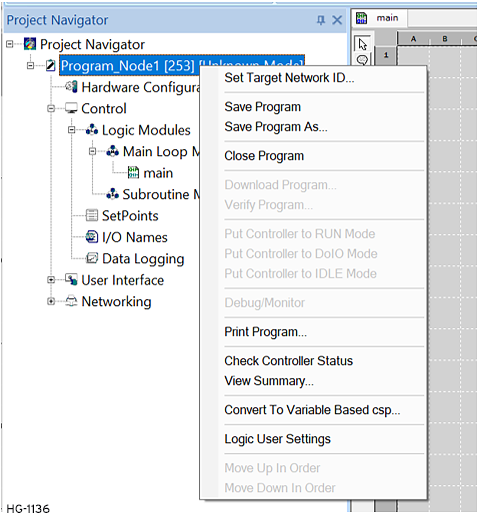
From Cscape 9.90 SP4 onwards, Cscape allows migration of register based advanced ladder program to variable based advanced ladder. Open any existing advanced ladder (register based) program. Right-click on the opened program in project navigator and select the option "Convert To Variable Based csp.."
Once user selects "Convert To Variable Based csp...", Cscape will display the following message:
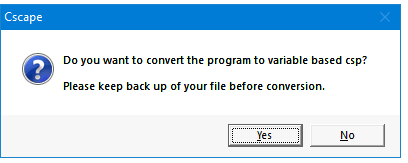
Selecting Yes, displays Save As window prompting user to save a new file for the converted file. Selecting No does not convert the selected program.
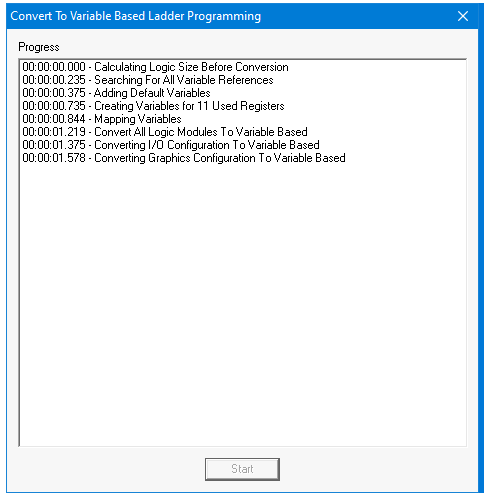
Once user saves the file, Cscape will display the following window which gives details of conversion upon selecting Start button.
Once conversion is completed, Cscape displays the following Conversion Successful message window.
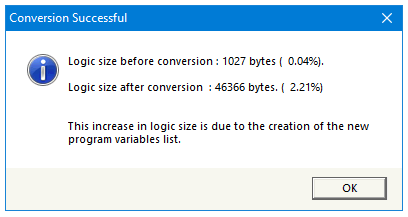
Note: While converting program from register based Ladder to variable based ladder there is an increase in logic size due to the newly created program variable data. They are also downloaded for uploading later.
Naming Conventions
-
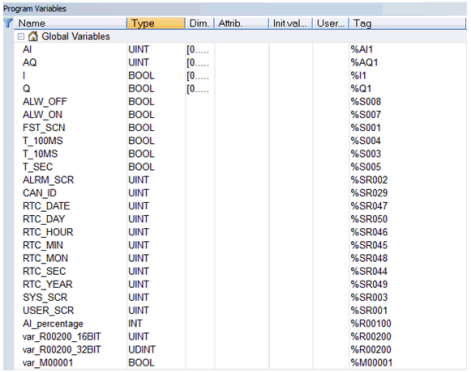
System Registers used in register based ladder program will get converted with predefined variable names in variable based ladder program. For example: %S7 will get converted to ALW_ON.
-
Registers with IO name in register based ladder program will get converted to variables with Name as given in IO name. Variables will be tagged to that Registers.
-
Registers without IO name in register based ladder will get converted with default naming as var_XXXXXX where XXXXX is the register used. For example - %R200 in register based ladder will get converted to var_R200 in variable based ladder.
-
In Normal ladder if same Register is used with different data types then after conversion variable names are created with datatype as suffix. For example - if R200 is used as Int as well as Dint in Normal ladder, then it will get converted to var_R200_16Bit and var_R200_32Bit.
After conversion from register based ladder to variable based ladder if needed, user can change the variable names as per their requirement. Each variable should have unique name, so user cannot assign same name to different variables. Cscape will give error message if user tries to modify the name and there is a duplication of name
Limitations
-
From Cscape 9.90SP3 onwards, in Variable Based programming language Timer, Counter and PID supports only predefined structures. Array variables or user defined structures are not supported in Timer /Counter and PID ladder blocks.
-
After migration from Normal ladder to variable based ladder, Timer /Counter and PID ladder blocks are assigned with array variables. After migration, functionality wise these blocks will work as it works in Normal ladder. If user tries to edit the blocks, there will be error for "Enter a valid Address". so after migration user has to change the array variables in Timer/counter and PID blocks to predefined structure variables.
-
Functionality of Indirect Move Block (Mode: Indirect) is different in register based ladder and variable based ladder . So, register ladder with Indirect Move block will get converted to variable based program with NO variables assigned to Indirect Move block. So, after conversion there will be compilation error for Indirect Move block that user must correct it.
-
If mapping of variable is having same registers, then in the uploaded program based on priority of variable present in table, variable will set. The mechanism of identifying type of the variable is not present yet.
-
Conversion of a variable based program is not supported in Envision RV/Web designer models.
Return to the Top: Variable Based Advanced Ladder
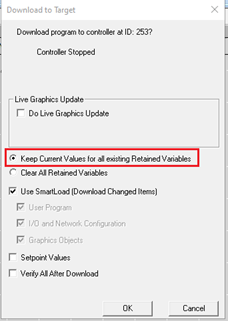
From Cscape 10.0 onwards, when users download a program created in the 'Advanced Ladder with Variable-based Addressing Editor’, there is an option available in the download dialog to select 'Keep Current Values for all Existing Retained Variables' or 'Clear all Retained Variables’.
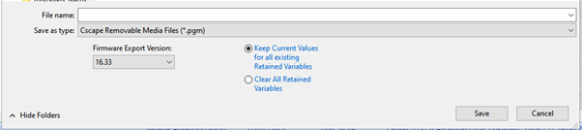
Likewise, this selection can be made during Export to PGM as well.
Download Window
Keep Current Values for all Existing Retained Variables
Selecting this option in the download window will ensure that the previous values of the configured Retain variables are retained after downloading.
However, this outcome is subject to the following scenarios -
• Retain variables will retain its previous values after download only when the retain variable names in the program to be downloaded match with the program in the controller.
• If there are any mismatches in the Retain variable names, the value of the retain variable with the modified name will be cleared.
NOTE:
• For Retain variables configured as single-dimensional or multidimensional arrays, if the array dimensions of these retain variables in the program to be downloaded do not match with those in the Controller’s program, then all values within those arrays will be cleared after download, even if they have the same variable names.
• For Structures & UDFBs or their sub-elements configured as an array under retain variables, if the array dimensions of these variables in the program to be downloaded do not match with those in the Controller’s program, the array elements will retain its previous values after download only if they have the same variable names.
• Whenever there is a change in the data length of any array or non-array type retain variable, such as from 16 bits to 32 bits or vice versa, the value of the retain variable with the modified data length will be cleared after download.
Clear all Retained Variables
Selecting this option in the download window will clear all the Retain variables value to zero.
![]()
NOTE:
1. Retain variables configured in the set point table will retain its values even if the program is downloaded selecting clear all Retained option.
2. In case of array element of a retain variable configured in the setpoint table then all the elements of that array will retain its previous values, even if the program is downloaded selecting Clear All Retained variables option.
Export to PGM
Keep Current Values for all Existing Retained Variables radio button -
Selecting this option in the Export to PGM window and subsequently loading the same PGM will retain the previous values of Retain variables that were already in the Controller before loading the PGM.
However, this outcome is subject to the following scenarios -
• Retain variables will retain its previous values after Load PGM only when the retain variable names in the exported PGM file match with those in the Controller’s program.
• If there are any mismatches in the Retain variable names, the value of the retain variable with the modified name will clear to 0.
NOTE:
• Retain variables configured as single-dimensional or multidimensional arrays, if the array dimension of these variables in the exported PGM file do not match with those in the Controller’s program then all the values within those arrays will clear to 0 after loading the PGM, even if they have the same names.
• For Structures & UDFBs or their sub-elements configured as an array under retain variables, if the array dimensions of these variables in the exported PGM file do not match with those in the Controller’s program, the array will retain its previous values after loading the PGM only if they have the same names.
• Whenever there is a change in the data length of any retain variable, such as from 16 bits to 32 bits or vice versa, the value of the retain variable with the modified data length will clear to 0 after loading the PGM.
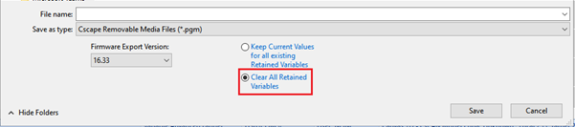
Clear all Retained Variables radio button -
Selecting this option in the Export to PGM window and then loading the same PGM will clear all the Retain variables value to zero.
NOTE:
1. Retain variables configured in the set point table will retain its values even if the program is downloaded selecting clear all Retained option.
2. In case of array element of a retain variable configured in the setpoint table then all the elements of that array will retain its previous values, even if the program is downloaded selecting Clear All Retained variables option.
Save/Load PGM
• If the PGM file was saved in the controller for the program that was downloaded with the 'Keep Current Values for all Existing Retained Variables' option selected in the download window, then loading the saved PGM file will retain the values for retain variables with matching names, while the values of retain variables with modified names will reset to 0 upon loading the PGM.
• If the PGM file was saved in the controller for the program that was downloaded with the 'Clear All Retained Variables' option selected in the download window, then loading the saved PGM file will reset all the Retain variables value to zero upon loading the PGM.
NOTE:
1. Retain variables configured in the set point table will retain its values even if the program is downloaded selecting clear all Retained option.
2. In case of array element of a retain variable configured in the setpoint table then all the elements of that array will retain its previous values, even if the program is downloaded selecting Clear All Retained variables option.
Make/Load Clone
The 'Make Clone' and 'Load Clone' will continue to function as it is irrespective of these selections.
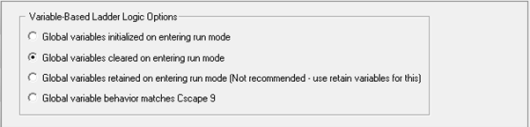
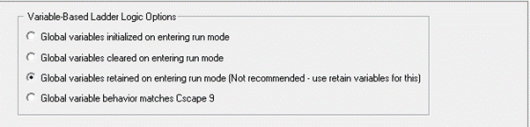
Global Variables Compiler Options
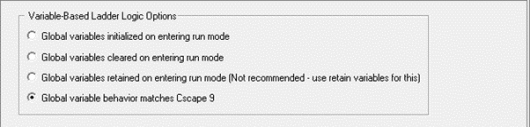
From Cscape 10.0 onwards, In the 'Advanced Ladder with variable-based addressing editor' programs, users have the option to select the behaviour of Global Variables when the controller transitions into RUN mode: whether they should be initialized, cleared, retained or behave same as in Cscape 9 version.
Open Logic User settings →Compiler options to navigate to this page.
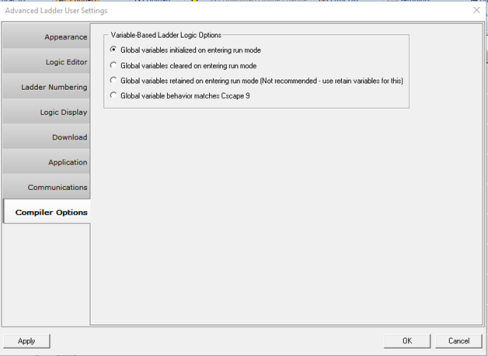
• Global Variables Initialized on Entering Run Mode
Selecting this option will initialize all the global variables once the controller enters RUN mode.

NOTE:
1. Global variables configured in the set point table will retain its values even if the compiler settings are set to Initialized on entering Run mode.
2. In case of array element of a global variable configured in the setpoint table then all the elements of that array will retain its previous values, even if the compiler settings are set to Initialized on entering Run mode.
• Global Variables Cleared on Entering Run Mode
Selecting this option will clear all the global variables values once the controller enters RUN mode.
NOTE:
1. Global variables configured in the set point table will retain its values even if the compiler settings are set to clear on entering Run mode.
2. In case of array element of a global variable configured in the setpoint table then all the elements of that array will retain its previous values, even if the compiler settings are set to clear on entering Run mode.
• Global Variables Retained on Entering Run Mode
Selecting this option will retain all the global variables values once the controller enters RUN mode which is not recommended. Instead of this retain variables can be used.
• Global Variables Behavior Matches Cscape 9
Selecting this option, global variables will function in the same way as in Cscape 9 versions, that is global variables will retain their values and any change in memory allocation of the variable will result in change in the variable values.