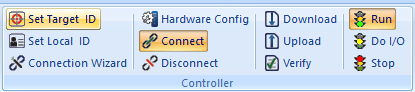
Set Target Network ID 
See also: Hardware Configuration
Topic Menu
Set Target Network ID Overview
Home > Controller > Set Target Network ID
Set Target Network ID![]() Usually refers to the ID of the device on a supported CAN, such as CsCAN, CANopen, etc. Each device must have a unique network ID. Also called Node ID. can also be accessed through the Project Navigator by right-clicking on the Program Name:
Usually refers to the ID of the device on a supported CAN, such as CsCAN, CANopen, etc. Each device must have a unique network ID. Also called Node ID. can also be accessed through the Project Navigator by right-clicking on the Program Name:
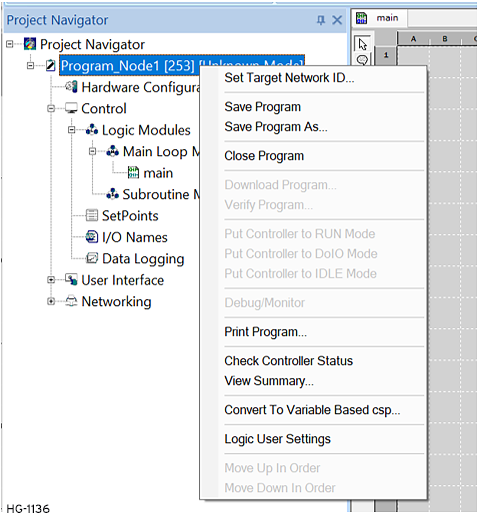
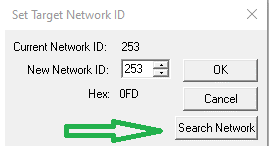
The Set Network CsCAN![]() Horner APG's proprietary network protocol that runs on the Bosch CAN network specifications. Prior to the advent of the OCS. ID dialog box specifies the controller ID to which this program is connected.
Horner APG's proprietary network protocol that runs on the Bosch CAN network specifications. Prior to the advent of the OCS. ID dialog box specifies the controller ID to which this program is connected.
Network ID Number - Use the Up and Down buttons to increment or decrement the value, or type the desired Network ID (Valid range: 1-253) directly into the Edit Box.
Hex:nnn: The selected Node ID![]() Usually refers to the ID of the device on a supported CAN, such as CsCAN, CANopen, etc. Each device must have a unique network ID. Also called Node ID. expressed in hexadecimal
Usually refers to the ID of the device on a supported CAN, such as CsCAN, CANopen, etc. Each device must have a unique network ID. Also called Node ID. expressed in hexadecimal![]() A base-16 numbering system which uses the symbols 0, 1, 2, 3, 4, 5, 6, 7, 8, 9, A, B, C, D, E, F for numeral. format. If the controller has rotary switches, the target ID is in hex.
A base-16 numbering system which uses the symbols 0, 1, 2, 3, 4, 5, 6, 7, 8, 9, A, B, C, D, E, F for numeral. format. If the controller has rotary switches, the target ID is in hex.
Click OK. The result is reflected in the Status Bar Pass Through![]() A feature of Horner APG’s OCS products is to connect Cscape “local”, aka directly, to an OCS, then do pass-through programming and monitoring to other “target” OCS controllers connected via CsCAN. Indicator:
A feature of Horner APG’s OCS products is to connect Cscape “local”, aka directly, to an OCS, then do pass-through programming and monitoring to other “target” OCS controllers connected via CsCAN. Indicator:

See also: Cscape Status Bar
Return to the Top: Set Target Network ID
Search Network for Controllers
Using the Search Network utility enables Cscape to search for all network IDs, or a range of IDs, that are on the networks.
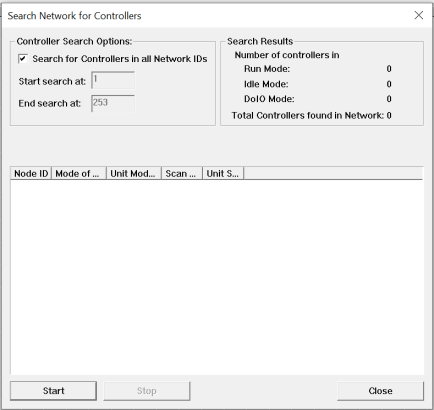
Controller Search Options
-
Search for Controllers in all Network IDs: Check box if an entire Network search is needed.
-
To search for a range of IDs:
-
Start Search at: enter an ID number
-
End Search at: enter an ID number
-
Start: Begins the network search
Scanning Status Bar: Displayed under the word Searching. This value is incremented by one for each Node ID![]() Usually refers to the ID of the device on a supported CAN, such as CsCAN, CANopen, etc. Each device must have a unique network ID. Also called Node ID. checked. The detection speed depends upon network speed.
Usually refers to the ID of the device on a supported CAN, such as CsCAN, CANopen, etc. Each device must have a unique network ID. Also called Node ID. checked. The detection speed depends upon network speed.
Dialog Box: Displays the units that responded and their Node ID, Mode of Operation, Model Type, Scan Time![]() Time required for the controller to read its inputs, solve the Ladder Logic program, and write its outputs. Scan times are usually expressed in milliseconds.
NOTE: Scan times can vary, depending on number and complexity of Ladder Logic rungs that are active during the "solve" portion of the scan. and Status.
Time required for the controller to read its inputs, solve the Ladder Logic program, and write its outputs. Scan times are usually expressed in milliseconds.
NOTE: Scan times can vary, depending on number and complexity of Ladder Logic rungs that are active during the "solve" portion of the scan. and Status.
Stop: Immediately stops the scanning process. If there are no more nodes online, this can save a considerable amount of time. The user does not have to let the scan run to completion.
After the scan stops (either by completion or by the user intervention), the search dialog displays search results which lists all controllers found in the network and their current status.
Return to the Top: Set Target Network ID
Setup a Pass Through Connection
Set up a Remote Unit - A Pass Through![]() A feature of Horner APG’s OCS products is to connect Cscape “local”, aka directly, to an OCS, then do pass-through programming and monitoring to other “target” OCS controllers connected via CsCAN. connection allows Cscape to program a Target Unit while physically
connected to another unit.
A feature of Horner APG’s OCS products is to connect Cscape “local”, aka directly, to an OCS, then do pass-through programming and monitoring to other “target” OCS controllers connected via CsCAN. connection allows Cscape to program a Target Unit while physically
connected to another unit.
-
Determine which unit (node) is to be the This is the unit to which Cscape is physically connected.
-
Establish a physical serial (RS-232) connection between Cscape and the local unit. Provide a suitable cable between the computer's serial (RS-232) port and the OCS serial port.
When the connection is properly established, Cscape reports a success in the Pass Cscape Status Bar Through Indicator:
Until the connection is established, the Pass Through Indicator reads Local:no comm.
Once the connection is established, the Pass Through Indicator shows the Net ID of the unit to which Cscape is attached.
-
Set the Unit ID (node number, network address, etc) of the target unit. This is the unit to which Cscape actually communicates. [Home > Controller > Set Target Network ID]. Select the Node ID
 Usually refers to the ID of the device on a supported CAN, such as CsCAN, CANopen, etc. Each device must have a unique network ID. Also called Node ID. of the remote unit, or type the number into the edit box.
 -
The Status Bar Pass Through Indicator reflects the changes, and also reports the Status of the remote unit (R), (D), or (I). If the remote unit can not be found, this reads (?).
At this time, one can now be able to communicate to the remote unit using any of Cscape's communication features - download, upload, etc.
Return to the Top: Set Target Network ID
Talking to the Local Unit
If the network is active on the local unit, it is necessary to select the local unit before communicating with it.
[Home > Controller > Set Target Network ID]. Select the Node ID of the remote unit, or type the number into the edit box.
Troubleshooting
If the Cscape Status Bar Pass Through Indicator fails to give a proper connected indication, check the following items.
-
If the Status Bar Pass Through Indicator reads Local:no comm, then the assigned COM port doesn't exist, or is in use by another program. Check for other programs that might be using serial ports, including another copy of Cscape that may be already running.
-
Is Cscape properly connected to the local unit? The Status Bar Pass Through Indicator reads Local:xx where 'xx' is the Node ID
Usually refers to the ID of the device on a supported CAN, such as CsCAN, CANopen, etc. Each device must have a unique network ID. Also called Node ID. of the LOCAL unit. -
Is the selected Target ID valid? Is there a node on the network programmed with the selected ID? Verify that the unit one intends to talk to has this Node ID programmed into it.
-
Is the network functioning?
Return to the Top: Set Target Network ID