CsCAN Horner APG's proprietary network protocol that runs on the Bosch CAN network specifications. Prior to the advent of the OCS. over Ethernet
See also: Ethernet Configuration Overview
Topic Menu

|
Comparing Ethernet IP, Modbus TCP & Ethernet Global Data |
CsCAN over Ethernet Overview
Note: This is a Built-In (Resident) Industrial Protocol.
CsCAN TCP Server Communication protocol is also known as CsCAN over Ethernet protocol. CsCAN over Ethernet protocol allows a CsCAN Host Programming Tool, such as Cscape, to access an OCS unit, as though it were connected directly to the OCS programming serial port.
CsCAN Over Ethernet Configuration
The OCS requires no protocol-specific configuration for CsCAN over Ethernet protocol. Only the general OCS configuration as described in Ethernet configuration section need to be done. If the OCS has been assigned an IP Address and Net Mask, it will automatically respond to CsCAN over Ethernet messages sent to it by a PC running Cscape.
To connect using CsCAN over Ethernet protocol, perform the following these steps:
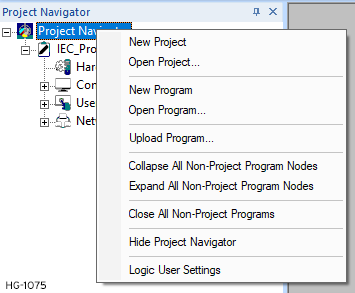
Step 1: Select Project Navigator > Right-Click > Logic User Settings
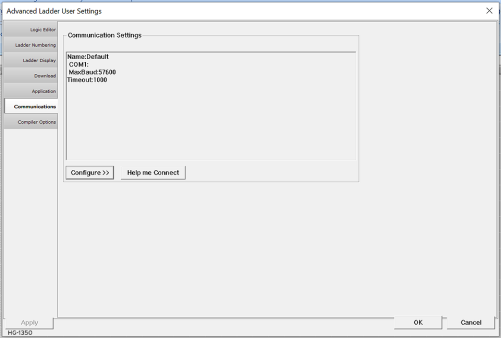
Step 2: Select Communications then select Configure>>
Step 3: Add details for Add Target. See below for details.
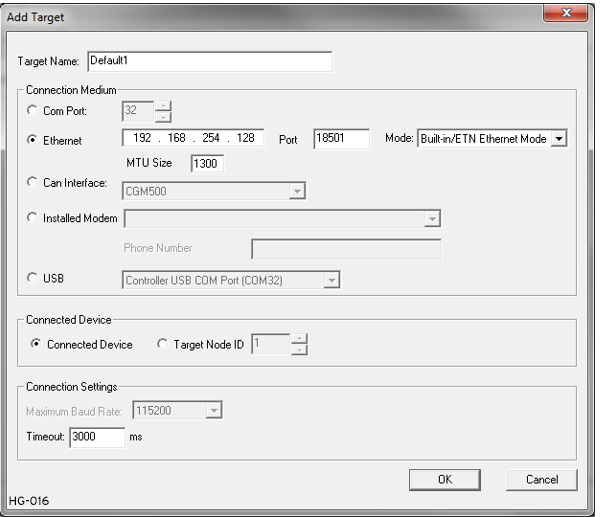
Select Ethernet from the Connection Medium list, and then set the Target IP Address and Timeout parameters as follows:
Target IP Address IP Address - Internet Protocol - This is the address of a device on an Ethernet or Wi-Fi network. Horner controllers currently use IPv4 standards with addresses consisting of 4 numbers, or octets, separated by decimal points.
Enter the IP Address previously assigned to the target OCS. Please refer to Chapter 3 regarding how to assign an IP Address to an OCS.
MTU Size: [Maximum Transmission Unit] Frequently networks are limited to MTU size of less than 1500 bytes. The MTU size should be set to match the network’s MTU.
To check the network’s MTU size, perform the following steps:
-
Click the Widows 'Start' button.
-
In the search field type: 'cmd' and press enter.
-
At the command prompt type: 'netsh interface ipv4 show subinterface'
Timeout
Enter a number between 1000 and 65,000 (in milliseconds) for the maximum expected network round-trip communication time. This value determines how long Cscape will wait for a response after it sends a CsCAN over Ethernet protocol command to the OCS. Also, because CsCAN communication is affected by ladder code scan rate, the Timeout value may have to be further increased to compensate for applications with very slow scan rates.
Note: For most local network applications, the default Timeout value of 1000 is sufficient. However, there are some network considerations, which may require the Timeout value to be increased to facilitate reliable communication. This includes heavily loaded networks, complex networks with multiple levels of routers and switches, and Internet communication.
Return to the Top: CsCAN over Ethernet
CsCAN over Ethernet Operation
As stated previously, the OCS allows a CsCAN Host Programming Tool, such as Cscape, to use CsCAN over Ethernet to perform all standard supervisory control, monitoring and programming functions with the OCS, as though it were connected directly to the OCS programming serial port. These standard supervisory functions include the OCS’s ability to handle pass-through communication with the CsCAN Nodes attached to the OCS CAN port. This feature is known as CsCAN single-point programming.
CsCAN over Ethernet Downloading Precautions
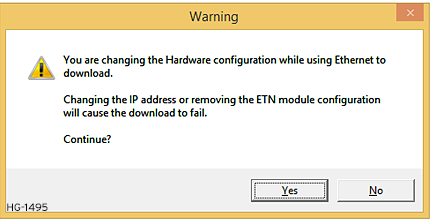
When downloading a new Ethernet configuration to a target OCS, using CsCAN over Ethernet protocol, extra care should be taken. When downloading I/O and Network Configuration, the OCS configuration is also downloaded, which has the potential to change the target device’s IP Address, or it could even remove the OCS configuration entirely, resulting in loss of communication and a failed download.
For this reason, when the Cscape user modifies the Hardware Configuration, and then starts to download it using CsCAN over Ethernet, Cscape issues a warning message, as shown in figure below:
Return to the Top: CsCAN over Ethernet
How to Prevent Losing Communication
Step 1: Ensure information is correct in the Hardware and LAN1 Configuration dialogs. Home > Hardware Configuration
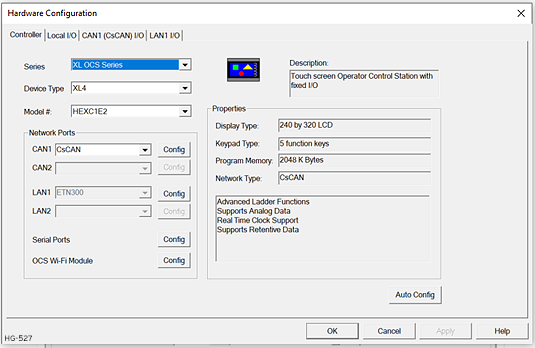
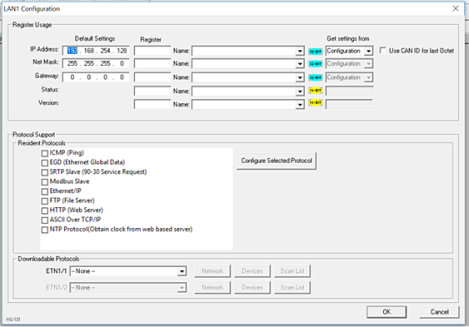
Step 2:Home > Hardware Configuration > LAN1 Configuration
Review Add Target Information: System > Logic User Settings > Communications > Configure>>
Before using CsCAN over Ethernet to download a new Hardware Configuration to an OCS, the application programmer should:
-
Make sure the new Hardware Configuration contains an OCS configuration.
-
Make sure the new Ethernet configuration will not change the IP Address.
-
Refer to [General Configuration] and review all the configuration steps.
OCS IP Address IP Address - Internet Protocol - This is the address of a device on an Ethernet or Wi-Fi network. Horner controllers currently use IPv4 standards with addresses consisting of 4 numbers, or octets, separated by decimal points. Table
-
If the new Ethernet configuration specifies “Get Settings From:” make sure the IP Address parameter matches Cscape’s Target IP Address.
-
If the new Ethernet configuration specifies “Get Settings From:” CAN ID, make sure the IP Address, which will be built from the combination of the IP Address parameter and the OCS/RCS CAN Network ID, matches Cscape’s Target IP Address.
-
If the new Ethernet configuration specifies “Get Settings From:” OCS Register, make sure the OCS register indicated by the IP Addr Register parameter contains an IP Address, and that it matches Cscape’s Target IP Address.
Note: If necessary, use Cscape’s Data Watch tool to set the OCS register to the correct IP Address before downloading. Refer to the Help file in Cscape for more information on Data Watch.
How to Recover from Lost Communication
If the OCS’s IP Address changes because of using CsCAN over Ethernet to download a new user program, activity will halt at the end of the I/O Configuration download, and communication between Cscape and the target OCS will be lost. Then, after several seconds, Cscape will display a Communication Timeout error.
If this happens, it is possible to recover Cscape communication with the target OCS, as follows:
-
Referring to OCS IP Address Table, determine the OCS’s new IP Address by using Cscape to re-examine the I/O Configuration just downloaded.
-
Referring to How to Prevent Losing Communication , change Cscape’s Target IP Address to match the OCS’s new IP Address.
-
Try performing the download again.
-
If this fails, try changing Cscape’s Target IP Address to match the static IP Address parameter (even if it is grayed out).
-
If all else fails, connect a PC running Cscape directly to the target OCS unit’s programming serial port, repeat the download, and then use Data Watch to examine the register indicated by the IP Addr Register parameter in the Hardware Configuration dialog to discover the OCS’s new IP Address.
Note: If the application programmer wants to use CsCAN over Ethernet to intentionally change an OCS’s IP Address, do this by (1) starting the download, (2) waiting for Cscape to timeout and (3) performing steps 1, 2 and 3 of the recovery process, as described above.
Return to the Top: CsCAN over Ethernet
CsCAN over Ethernet Security
To prevent the use of CsCAN over Ethernet protocol to gain unauthorized access to an OCS or RCC, Cscape Programming Software and OCS Ethernet Firmware can password-protect CsCAN over Ethernet communication. To implement CsCAN over Ethernet Security, use Cscape Programming Software, to perform the following nine steps:

Step 1: Open the user program previously created for the target OCS or RCS controller.
Step 2: If the user program has already been set up with security passwords, first log-in as the administrator. Select the Tools tab and then select Log In from the Security group. Enter the administrator password, and then click OK. Cscape will then acknowledge the administrator login; click OK again.
Step 3: On the main Cscape Toolbar, select the Tools tab and then Change Passwords in the Security group.
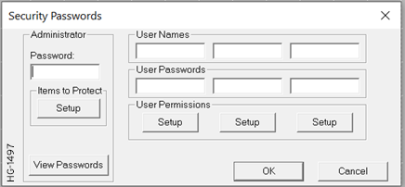
Step 4: Click on the View Passwords button to view the Administrator and User passwords.
Step 5: Change passwords and user names as desired for the application. NOTE: Passwords are numeric values between 1 and 999,999, while the user names can be any text from 1 to 15 characters long.
Step 6: Click on the Items to Protect Setup button to open the Administrator’s Security Settings dialog, as shown in screen shot below.
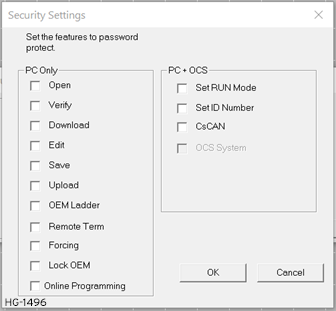
Step 7: To password-protect CsCAN over Ethernet protocol, make sure the CsCAN TCP (Ethernet) checkbox is checked in the Administrator’s Security Settings dialog. Then click OK.
Step 8: The Administrator password is always authorized for all protected features. If desired, one or more of the user passwords can also be authorized for CsCAN over Ethernet communication. To do this, refer to Security Passwords dialog and click one of the User Permissions Setup buttons to open that user’s Security Settings dialog. Then check the CsCAN TCP (Ethernet) checkbox and click OK.
Step 9: After downloading the user program to the target OCS or RCC, both Cscape and the OCS (or RCC) controller will enforce the new password security for CsCAN over Ethernet protocol.
Return to the Top: CsCAN over Ethernet