WebMI+
Topic Menu
WebMI+ Overview
WebMI+ Introduction
WebMI Plus (WebMI+) is an advanced version of WebMI available for CANVAS controllers. WebMI has certain limitations like some objects like Note, Recipe etc are not shown in web pages. These limitations are overcome by WebMI+. Also, there some few more added features available in WebMI+.
Major differences between WebMI and WebMI+ :
| Sl. No | WebMI |
WebMI+ |
| 1 | Webpage Title is user configurable | Webpage Title and Webpage icon/Logo are user configurable |
| 2 | User login screen is not configurable | User login screen is configurable |
| 3 | User login object is not configurable | User login object is configurable |
| 4 | Terms and conditions are set to Horner terms and conditions | Terms and condition can be enabled , disabled, or customized |
| 5 | Logo cannot be added to user login page | Logo can be added to user login page |
| 6 | Cannot be configured for Https | Can be configured for Https |
Web Options 
Settings related to user Login dialog, Terms, and condition of use etc are configurable in this option.
WebMI options are available under User interface or under Project Navigator > User Interface > Web > Display/Validate License
Configure Web Options
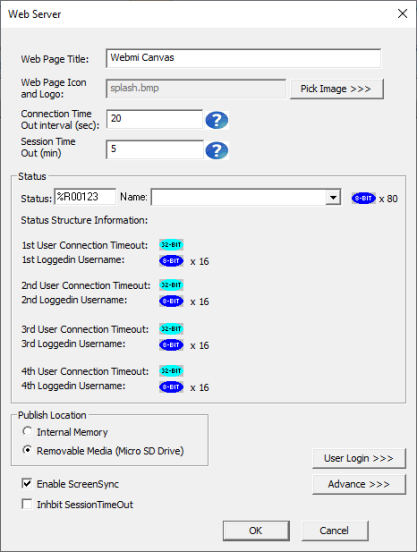
The following dialog is displayed:

-
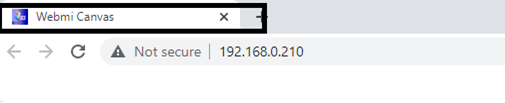
Set Web Page Title - This sets the text that will appear in the banner at the top of the web browser when the web page is launched. By default, it is set to "WebMI +". Users can change this if desired.
-
Web Page Icon and Logo - This is the web page icon and logo displayed when web pages are launched in the web browser. "Logo.png" is the default icon. Users can change both.
-
Connection Time Out interval (sec) - This value specifies after how many seconds the connection timeout message will appear on the screen if there is no internet connection. Once internet is regained, an authentication window will be displayed.
-
Session Timeout - After the configured timeout (Session timeout), the 'user session timed out' message will appear. The message will remain until the user refreshes the page.
-
Status Register - This provides the user's log in and the connection timeout information.
-
Publish Location
-
Internal Memory - Publishes web pages to the device's internal memory
-
Micro SD Drive - Publishes web pages to the MicroSD card.
-
-
Enable Screen Sync - Synchronizes web pages between the browser and the device.
-
Inhibit Session Timeout - Use this option to inhibit a Session Timeout. The session will run indefinitely.
-
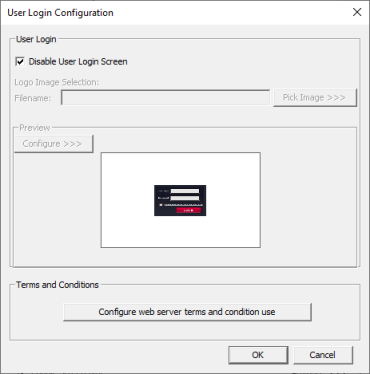
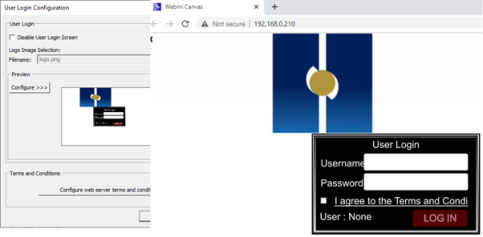
User Login: Configurations like logo image, login dialog settings, and web server terms and conditions are set here. Selecting "User Login" displays the following dialog.
-
Disable user login screen – Checking this option disables the user login screen in web browser. Web pages will be displayed directly in the browser.
-
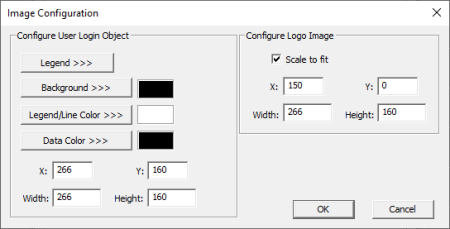
Logo image section – This option will be enabled when ‘Disable user login screen’ is unchecked. Users can select the logo to be displayed as shown below. The logo position, height and width can be adjusted by clicking on the configure button.
-
Preview – Configure the user login object.
-
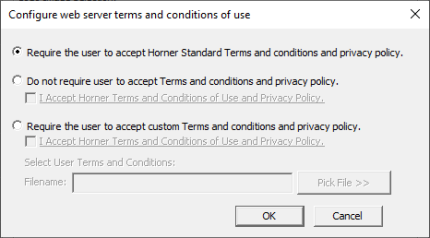
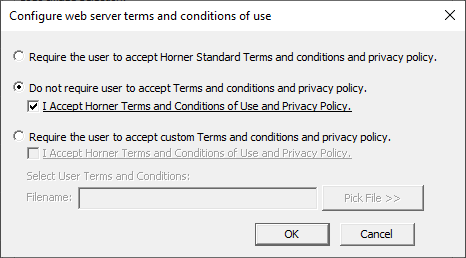
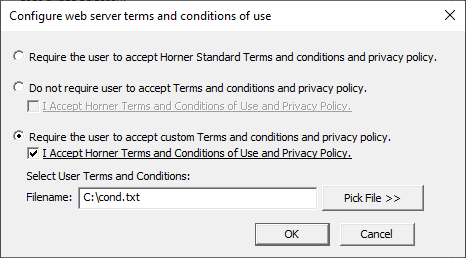
Terms and Condition – In this option User can select the way to accept Terms and conditions of use while launching web pages in browser.
-
Require the user to accept Horner standard terms and condition – In the user login dialog “I agree to Terms and Conditions” checkbox will be there and user must check that to log in.
-
Do not require user to accept terms and condition and privacy policy – Selecting this option and checking ‘I accept horner terms and conditions and privacy policy’, means the User Login dialog does not prompt anyone to accept terms and conditions.
-
Require user to accept custom terms and condition and privacy policy - user can add their own Terms and Condition file which would get displayed when user clicks on the “I agree to the Terms and condition" in the user login dialog
-
-
-
Advance
-
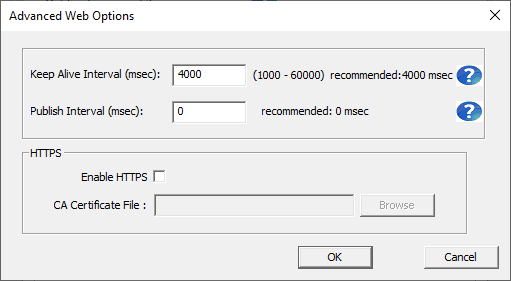
Keep Alive interval (mSec) – Keep Alive Interval specifies at what rate the network heart beat is checked in msec. Default is 4000 msec, after every 4 sec it checks for reply from the device to confirm the network is up. If there is no reply after 4 sec, then it will show temporary disconnection in network symbol on the web page, so that the user knows that and the data changes will not be reflected during this time. During this time, connection is not terminated but after 4 seconds it checks for connection timeout.
-
Publish interval (mSec) - Publish Interval specifies at what rate the variables will be updated on the webpage. If set to 0 (which is default and recommended), it is event driven where the changes are reflected immediately. If any other value is set in msec, it takes corresponding msec to update the value.
-
Enable Https – This allows opening browser in https
-
CA Certificate File - Enable HTTPS checkbox allows user to select certificate file in ‘.pem’ format, certificate file could be self-signed or purchased for given URL/IP.
-
Return to the Top: WebMI+
Display or Validate License
For Canvas Models, WebMI+ is enabled by default.
Return to the Top: WebMI+
Publish WebMI+ Pages
WebMI+ options can be accessed under web of Project Navigator.
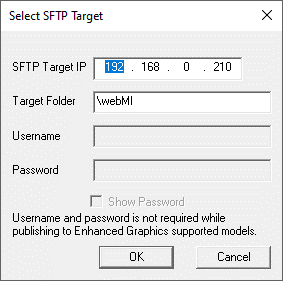
Selecting Publish Web Site, opens the following window:
-
Select SFTP Target - WebMI+ should open with the specified IP address
-
Target Folder - This folder gets created, in internal memory or Removable media, as specified, and gets published from this folder.
Return to the Top: WebMI+
Browse Website
Double click this option to launch web pages in the browser.
Return to the Top: WebMI+
Publish to Removable Media
WebMI+ pages can be directly published to Removable Media instead of publishing to the controller's internal memory. A folder named "WebMI" will be created in the selected location, whether the removable media or any PC location
If the device program resolution and published program resolutions are different, then the changes made in the enhanced property of the graphics object will not be matching in the device and WebMI+ browser.
Return to the Top: WebMI+