CAN Communications 
See also: Networking and Communications
Topic Menu
CAN1 Network Configuration
This opens the Network I/O Configuration dialog for this controller. Home>Controller>Hardware configuration> CAN1 or through the Project Navigator > Networking>CAN1 configuration
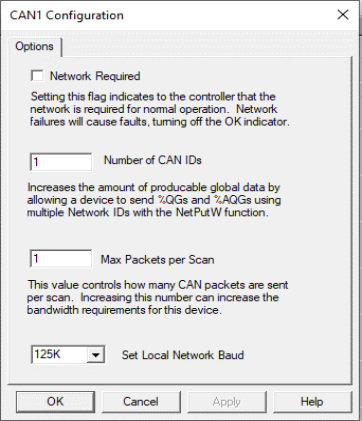
When CAN1 Configuration is selected, the following screen will appear:
-
Network Required - If this box is checked then the controller verifies that the network is attached and running. If the network tests fail, the controller generates faults, and the OK light (if available) is turned off. If this option is unchecked, the network will still function but faults will not be reported and the OK indicator will remain on if the network is not functioning.
-
Network Optimized - If this box is checked CsCAN
 Horner APG's proprietary network protocol that runs on the Bosch CAN network specifications. Prior to the advent of the OCS. messages are transmitted using a new optimized format.
 -
Check with the user manual for other CsCAN devices to determine if it can receive optimized CsCAN data. This option is only available if the Network Required box is checked.
-
Number of Network IDs
Usually refers to the ID of the device on a supported CAN, such as CsCAN, CANopen, etc. Each device must have a unique network ID. Also called Node ID. - OCS products can transmit more than one ID's worth of outgoing data using the Network Put Word [Function Blocks]. This setting defines the number of consecutive IDs that can be used to transmit data. For example if the primary network ID is 10 and the number of network IDs is set to 5, this device can send data using ID 10, 11, 12, 13, and 14. No other device should be assigned these IDs or a duplicate ID error will occur. -
Max. Packets per Scan - OCS products normally transmit 1 CAN packet per scan. This number can be increased to speed communications. Doing this also increases the bandwidth
The range of frequencies over which a system is designed to operate. The bandwidth is expressed in Hertz between the highest and lowest frequencies. needed and may adversely affect high-traffic networks. This option is only available if the Network Required box is checked.
Set Local Network Baud Rate :
Select the new network baud rate from the drop-down list and press OK. The target controller will now be set to the new baud rate.

Warning: Changing the baud rate will prevent communication with other controllers that are not set to the same baud rate.
Note: Increasing the baud rate will reduce the maximum length of the network cables and may reduce noise immunity.
Note: Different networks may have different options for baud rate from those shown above.
CAN2 Network Configuration 
See also: Networking and Communications
Home>Controller>Hardware configuration> CAN2 or through the Project Navigator > Networking>CAN2 configuration.
CANopen Networking Bit Rates
50Kbps
125Kbps
250Kbps
500Kbps
1000Kbps
When CAN2 Network Configuration is selected, the following screen will open:
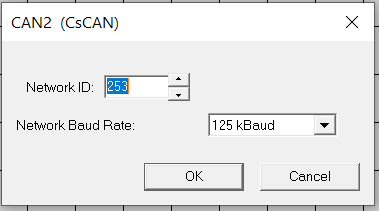
To change the Network ID, use the up and down buttons, or enter the number into the numeric box.
To change the Network Baud Rate, click on the down arrow to make the pull-down menu appear. Select from one of the other baud rate options.